How the search works
This chapter explains what the platform actually does between the moment you enter a search term and the moment a finding appears in your project. It is written to be read without technical background; the aim is that you can judge why a result appeared and how much confidence to place in it.
Mapping to the internal diagrams
The technical diagrams of the search pipelines have their own labels. This table maps them to the following sections, for anyone reading both side by side.
| Diagram | Pipeline | Described in |
|---|---|---|
| Diagram 1 | AttackSurfaceScopeIP |
Route 1: IP addresses and IP ranges |
| Diagram 2 | AttackSurfaceScopeDomain |
Route 2: Domains |
| Diagram 3 | AttackSurfaceScopeKeyword |
Route 3: Keywords |
| Diagram 4 | AttackSurfaceScopeDomainAsKeyword |
Route 3: your domains used as keywords |
| Diagram 5 | Darknet Alerts |
Darknet, Alerts route |
| Diagram 6 | Domains |
Darknet, Leak search route |
| Diagram 7 | ReverseLookup |
Darknet, Reverse lookup route |
| Diagram 8 | EmployeeScopeDomainsAndEmails |
Employees |
In the diagrams, the skip discovery decision is the fork described under The decision that matters most, and the monitoring or rescans decision is the comparison step described under Repeat runs.
The short version
- You define a scope. A list of search terms. Each term is a domain, a keyword, an IP address, or an IP range.
- The platform sorts the scope by type and sends each entry down the route that suits it. A domain is treated differently from a keyword.
- Every route searches the platform's index of internet scan data, and then performs targeted checks against the systems it has identified.
- Each route ends in one of two places: as a suggestion in the Discovery view, awaiting your assessment, or directly as a confirmed entry in the project.
- Confirmed entries can produce further search terms, so the next analysis starts from a wider scope. This is why a project grows over the first few cycles and then settles.
The rest of this chapter describes each of the three search scope: Attack surface, Darknet, and Employees, in turn.
Job types
Every analysis runs as one or more jobs, which you can follow in the Search Jobs view. The job types serve different purposes:
| Job type | Purpose |
|---|---|
| Asset | Works on targets that are already known and specific: the domains and IP addresses in your scope. It confirms what is there and describes it in detail. |
| Discovery | Works on the open-ended part of the scope: keywords, and your own domains used as keywords. It looks for systems that might belong to you and proposes them. |
| Employee Lookup | Enriches employee records with additional data. Started through Employee data enrichment in Intel → Employees, using employee lookup quota from the company plan. |
An Asset job answers what does this system look like. A Discovery job answers what else might be ours. Together they produce a project that is both accurate and complete.
The Monitoring Asset and Monitoring Discovery types are the same two jobs, started automatically by the monitoring schedule instead of by you.
The decision that matters most: suggestion or asset
At the end of each route, the platform reaches a fork:
| Path | What happens | Where you see it |
|---|---|---|
| Stage as a suggestion | The finding is written to Discovery with the evidence that produced it. Nothing is added to the attack surface yet. | Discovery |
| Write directly | The finding is written straight into the project as a confirmed asset. | Assets |
Staging is the default, because a match is not yet proof of ownership: a keyword that identifies your company can equally appear in a hosting provider's banner. Staging gives you the chance to reject that.
Writing directly is what the scan option Add keyword search results to assets switches on. It removes a review step and is therefore faster, at the cost of accepting every match, including the wrong ones. See the Options tab of the project settings.
Which to choose
Leave staging switched on for any scope that contains keywords. Consider writing directly only where the scope is narrow and precise, a list of your own domains and registered IP ranges, and where nobody is available to work through the discovery queue.
Attack surface
The attack surface scope answers: which of our systems can be reached from the internet, and what is running on them? Depending on the type of the search term, one of three routes is taken.
Route 1: IP addresses and IP ranges
This is the most direct route, because the target is unambiguous.
- The platform searches its scan-data index for every address in the range.
- Each address that answers is documented: which services respond, on which ports, with which software.
- The documented services are then enriched in parallel: a screenshot of each web service, an analysis of the TLS configuration, and the assignment of known vulnerabilities to the identified software.
- The results are written to the project as hosts, services, Whois data, and certificates.
Alongside the confirmed results, this route produces suggestions: domain names found through reverse DNS, names read from certificates, Whois contacts, and the autonomous system the range belongs to. These are the candidates for widening the scope.
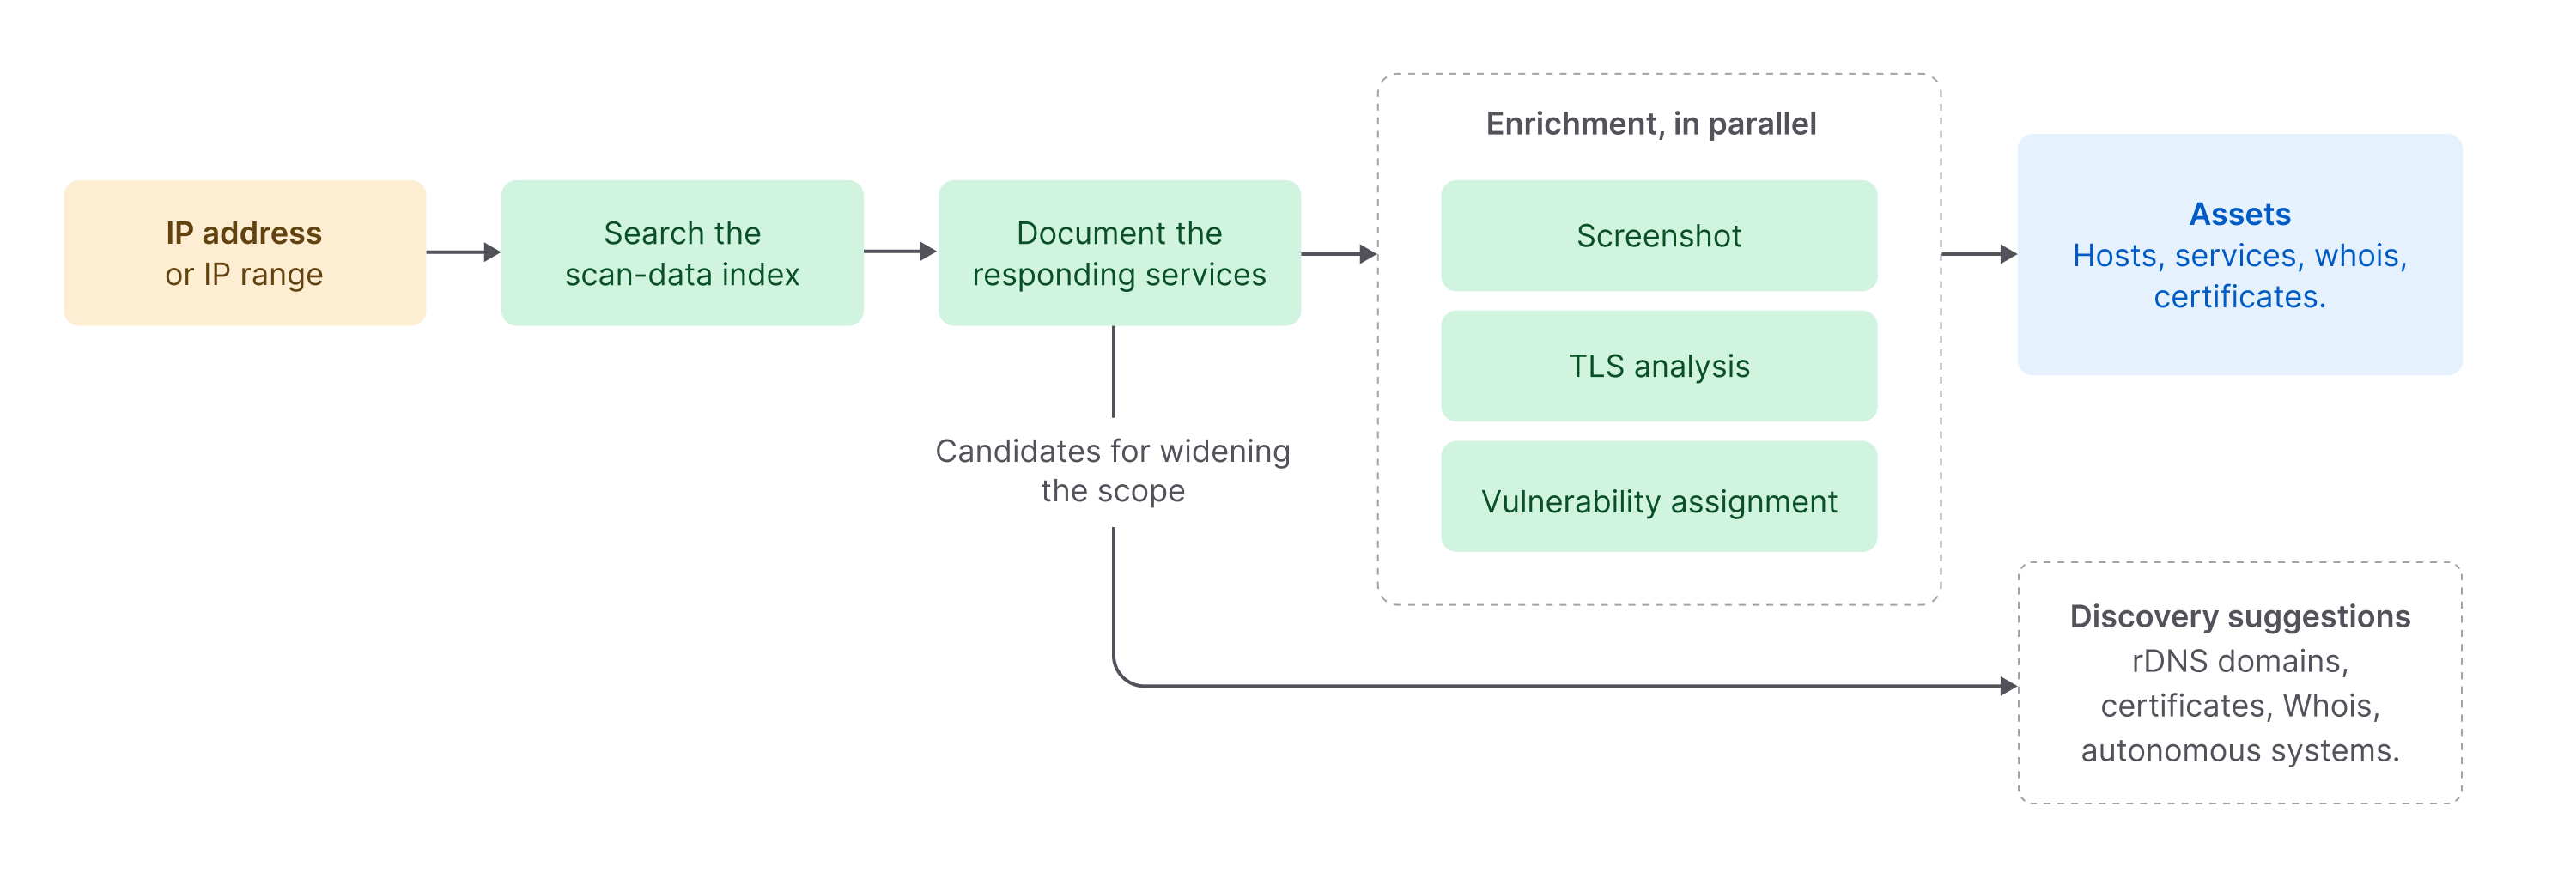 Diagram 1: IP addresses and IP ranges
Route 2: Domains
A domain is a starting point rather than a target, so this route first works out what the domain actually covers.
- Subdomain enumeration. Several independent external sources are queried in parallel for subdomains of the domain, and their results are merged into one list. Using several sources matters: each finds subdomains the others miss.
- Resolution. Every name in the merged list is resolved to its IP addresses.
- Scanning and documentation. Those addresses are then treated much like Route 1. The responding services are documented.
- Enrichment. Screenshots, TLS analysis, and vulnerability assignment are applied as before.
- Domain checks. In parallel, the domain itself is examined. This produces findings in its own right and can reveal further domains, which are fed back into the list.
How aggressively step 1 searches is governed by the scan options Use external active subdomain enumeration, Use external passive subdomain enumeration, and Subdomain enumeration from domains only. Passive enumeration reads existing databases; active enumeration tests candidate names itself and therefore finds more, more slowly.
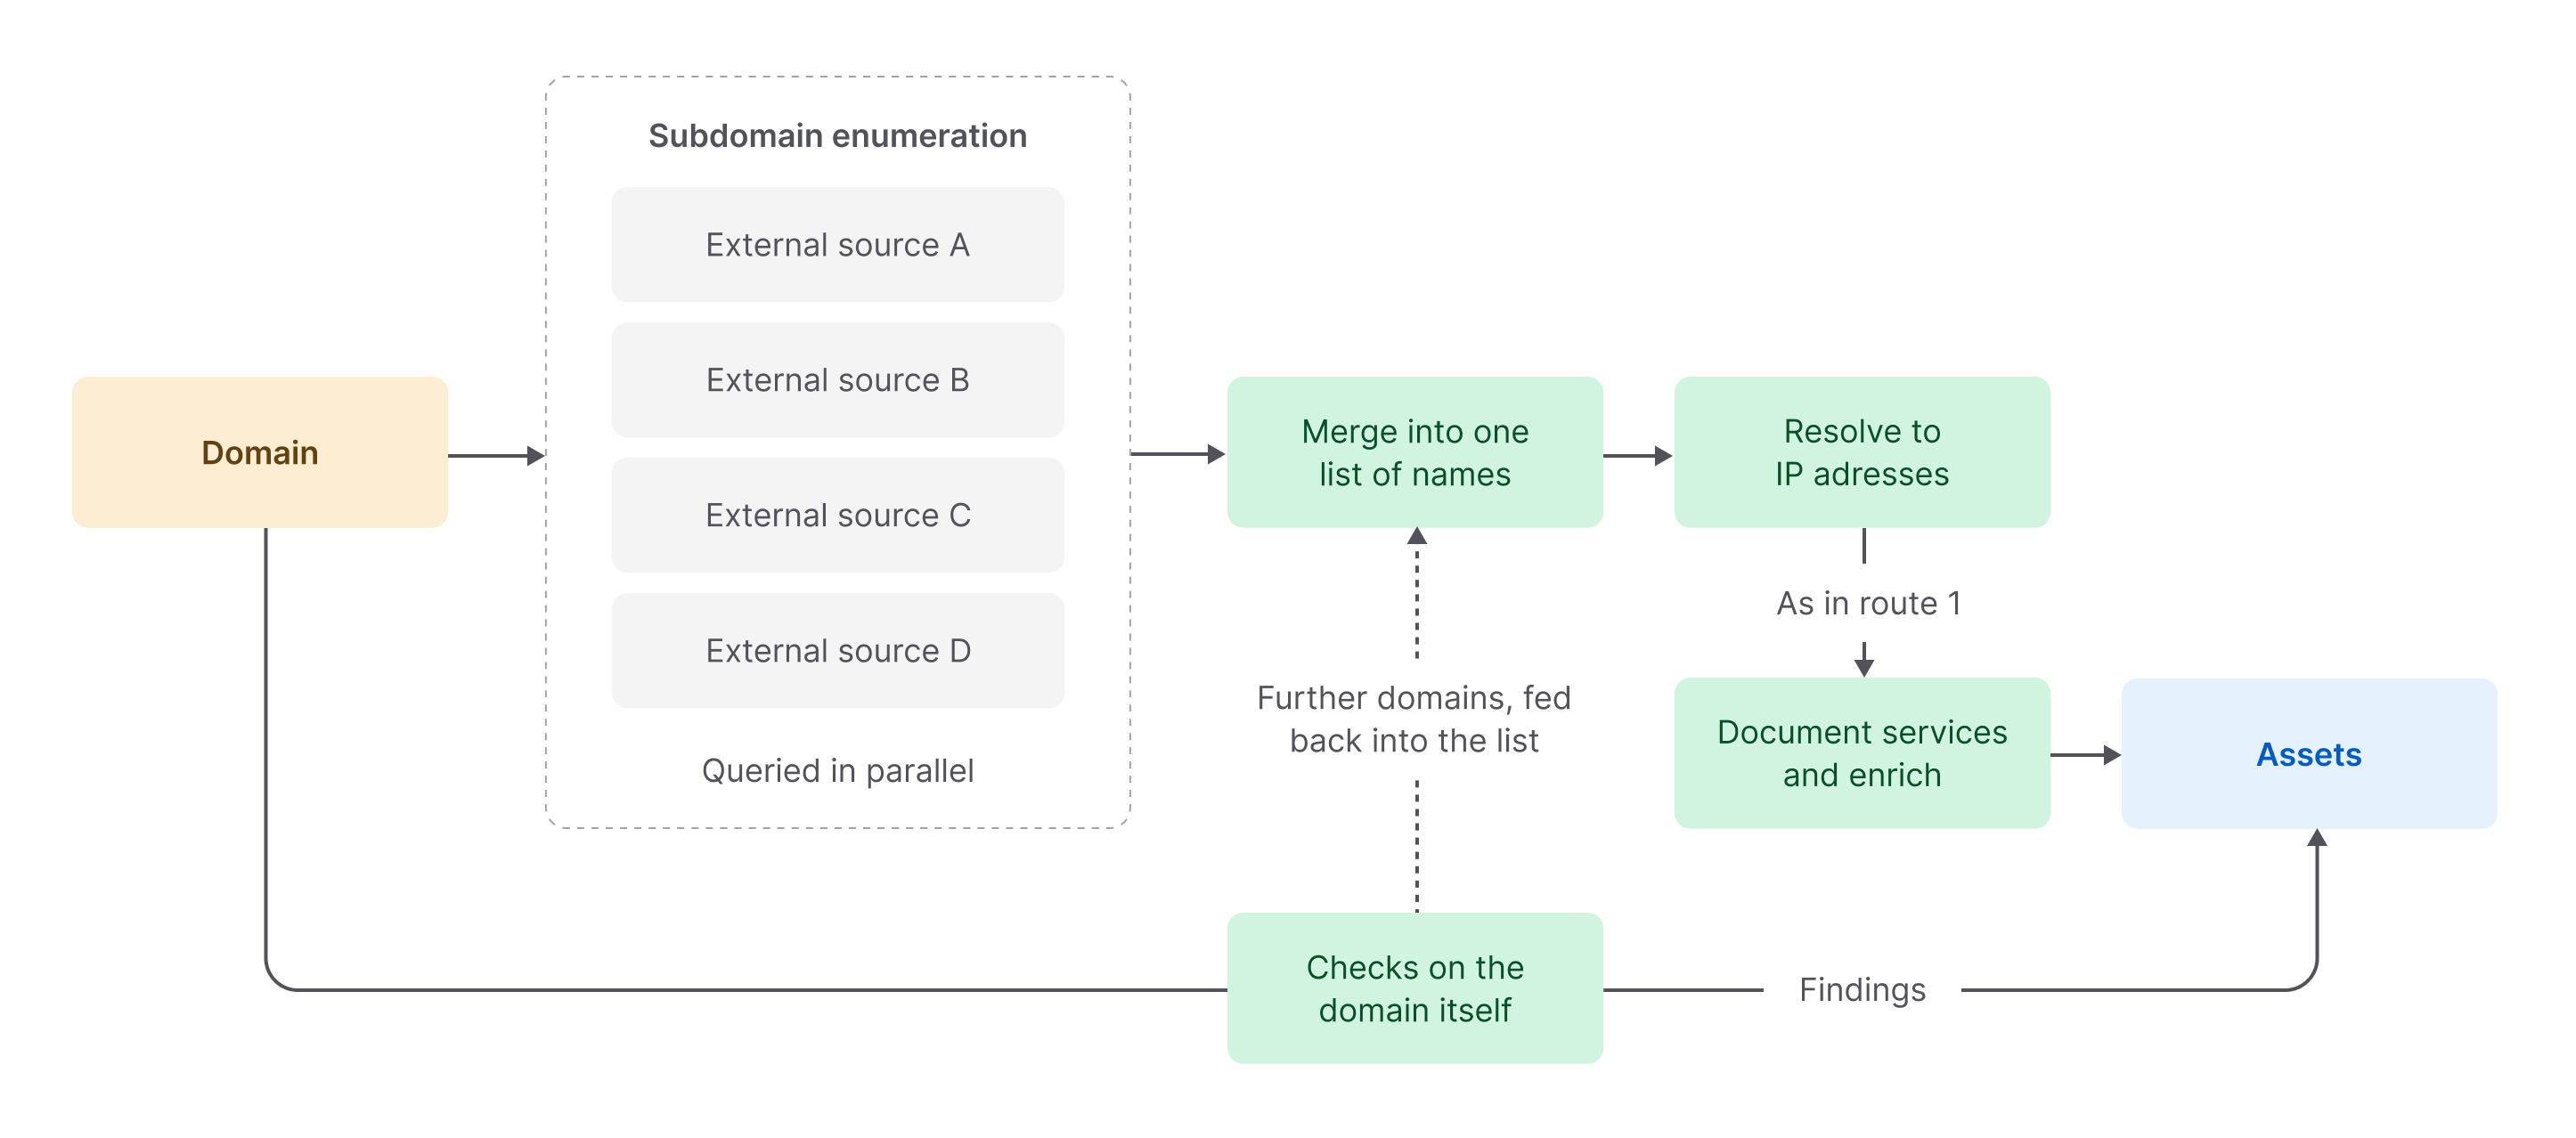 Diagram 2: Domains
Route 3: Keywords, and your domains used as keywords
This is the open-ended route, and the one that finds systems you did not know about.
- The keyword is searched across the platform's scan-data index. In service banners, certificate attributes, Whois records, and autonomous system names.
- Everything that matches is documented in the same way as the other routes.
- The matches are staged as suggestions: domains from reverse DNS, certificates, Whois records, and autonomous systems. Where the keyword was found in a service banner, the service itself is suggested as well.
Your own domains are additionally run down this route as if they were keywords. A domain used as a keyword finds systems that merely mention the domain, in a certificate, a banner, or a Whois record, rather than only those that resolve from it. This is how the platform finds a forgotten server that still carries your name in its certificate.
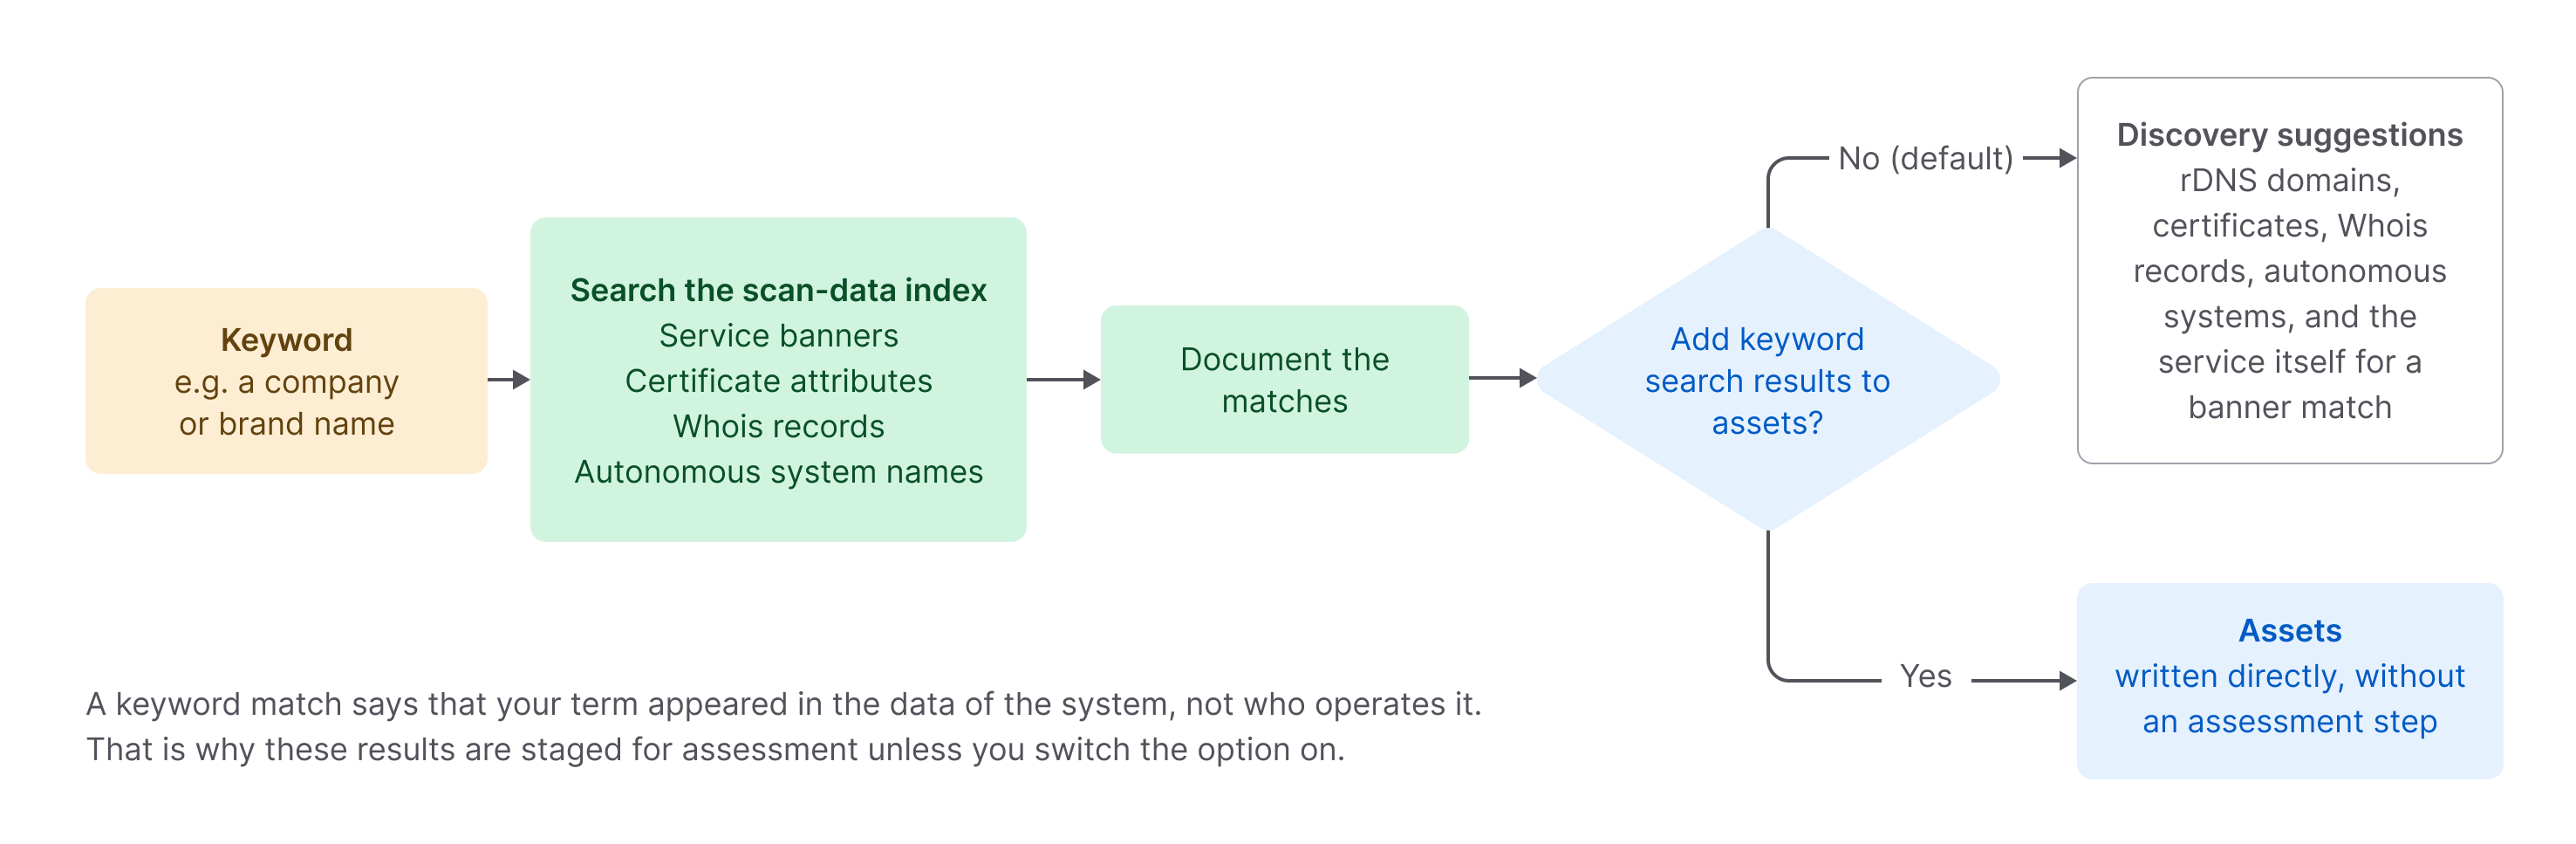 Diagram 3: Keywords
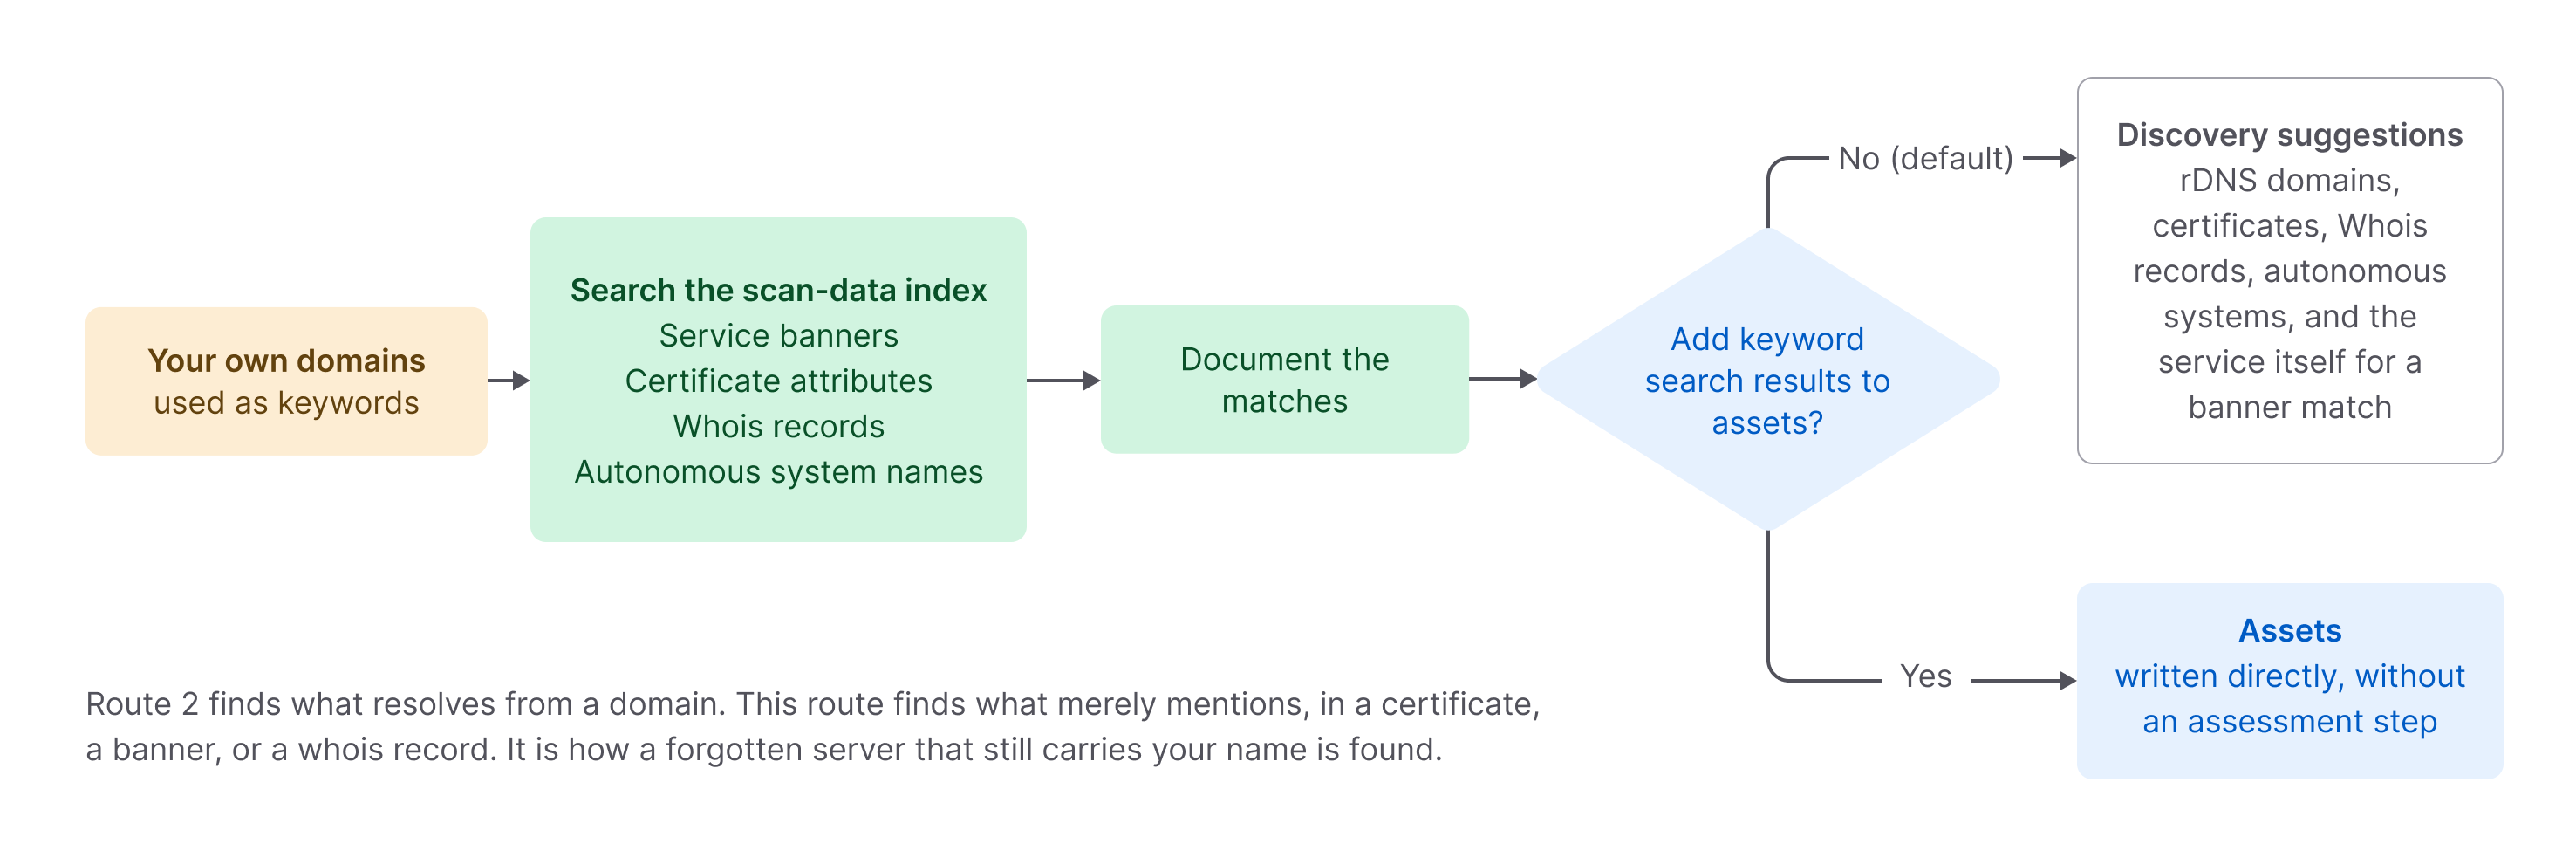 Diagram 4: Your domains used as keywords
Why keyword findings need assessment
A keyword match tells you that your term appeared in the data of a system. It does not tell you who operates that system. A hosting provider, a content delivery network, or a customer of yours can all carry your name. This is precisely why keyword results are staged in Discovery rather than written to the assets.
Repeat runs
For a monitoring run or a rescan, the routes above are preceded by an additional comparison step, so that the platform can report what has changed rather than restating the full result each time. This is why the second and later runs of a project usually complete faster than the first.
Darknet
The darknet scope answers a different question: has data belonging to us already been published? Nothing is scanned here. The platform searches collections of leaked data. Three routes run in parallel.
| Route | Input | What it does |
|---|---|---|
| Leak search | Domains | Searches leak collections for records belonging to your domains. The results are analysed to determine what kind of data was exposed and how serious it is, before they are written to the project. |
| Reverse lookup | Domains | Queries indexes that map your domains to documents in which they appear, and records a finding for each result. |
Each route writes its findings to the project, where they appear in the Darknet view with a severity, the affected data categories, and a recommendation. Because the sources are historic collections, findings can refer to a leak that is years old. The Published on column tells you which.
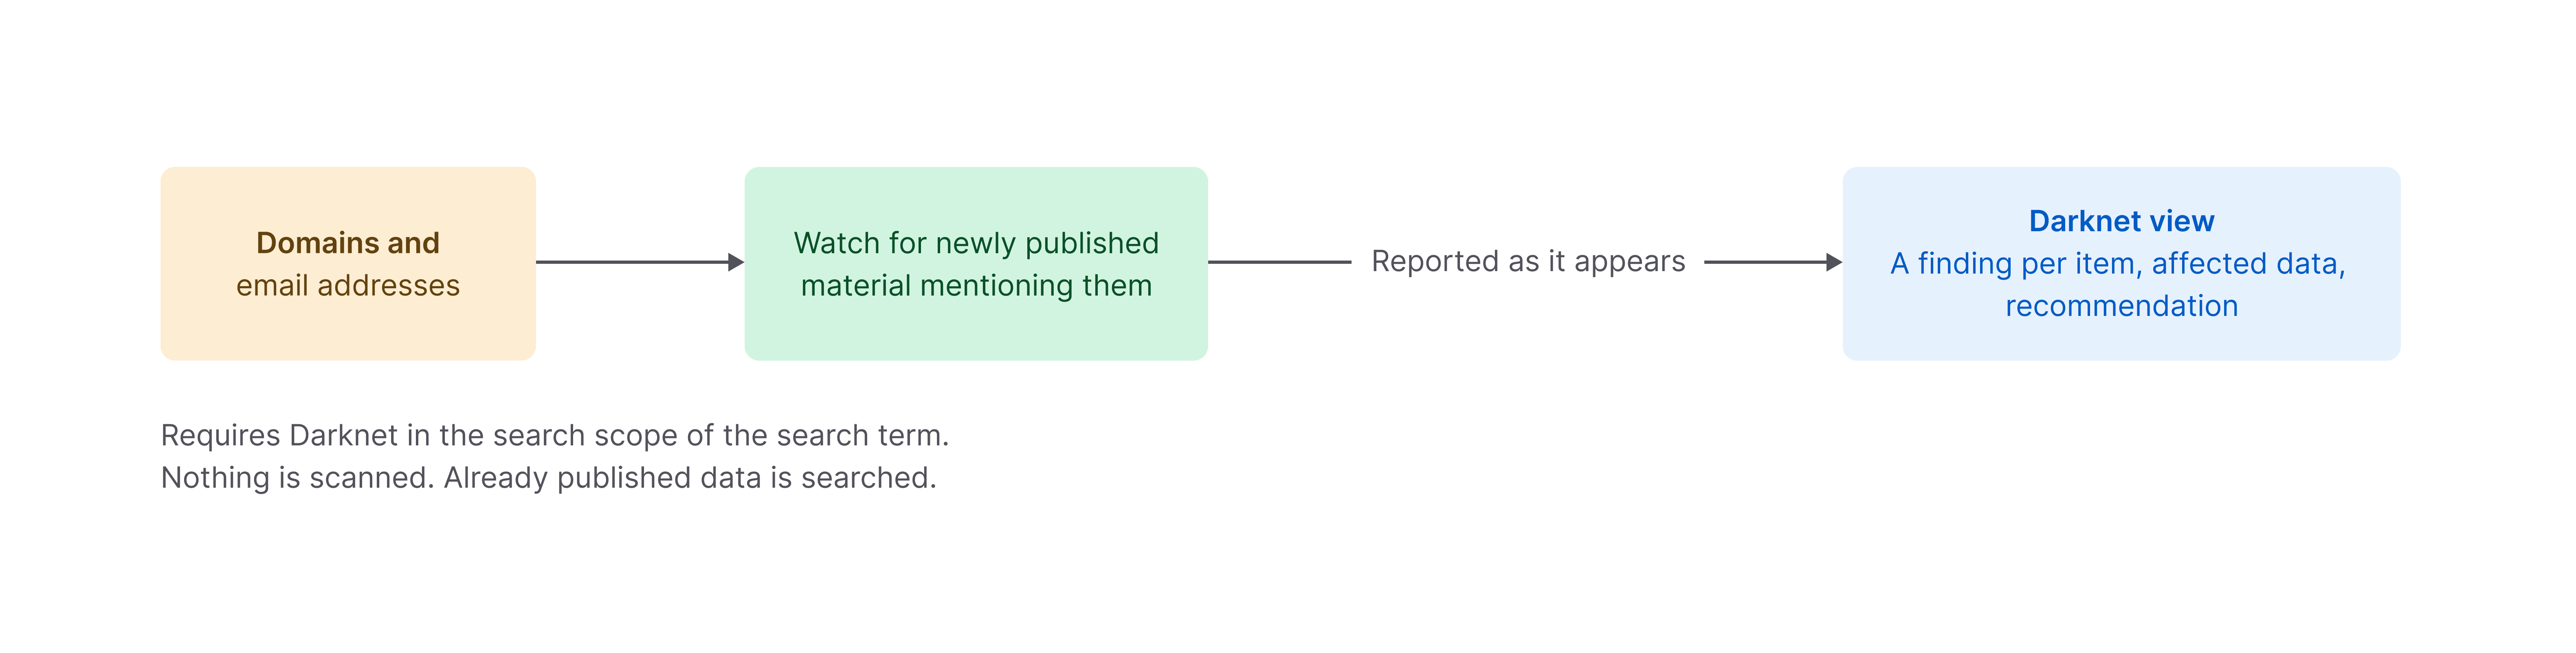 Diagram 5: Darknet - Alert route
 Diagram 6: Darknet - Leak search route
 Diagram 7: Darknet - Reverse lookup route
Why the darknet scope must be enabled per search term
Only search terms that carry Darknet in their search scope are used here. A domain analysed for the attack surface alone produces no darknet findings, however exposed it is. See Scope.
Employees
The employee scope answers: which of our people are publicly identifiable, and what is published about them?
This is the simplest of the three scopes. The main domains and email addresses of the project are sent to two independent kinds of source in parallel:
| Source | What it contributes |
|---|---|
| Professional and social profile data | Names, job titles, employers, and locations of people associated with your domains. |
| Directory and phonebook data | Email addresses and further contact details associated with your domains. |
Both sets of results are written to the project and appear in the Employees sub-tab of Intel. Because two independent kinds of source are used, a person may be found by one and not the other, which is why some records are more complete than others. Employee data enrichment in that view requests additional attributes for a single person on demand.
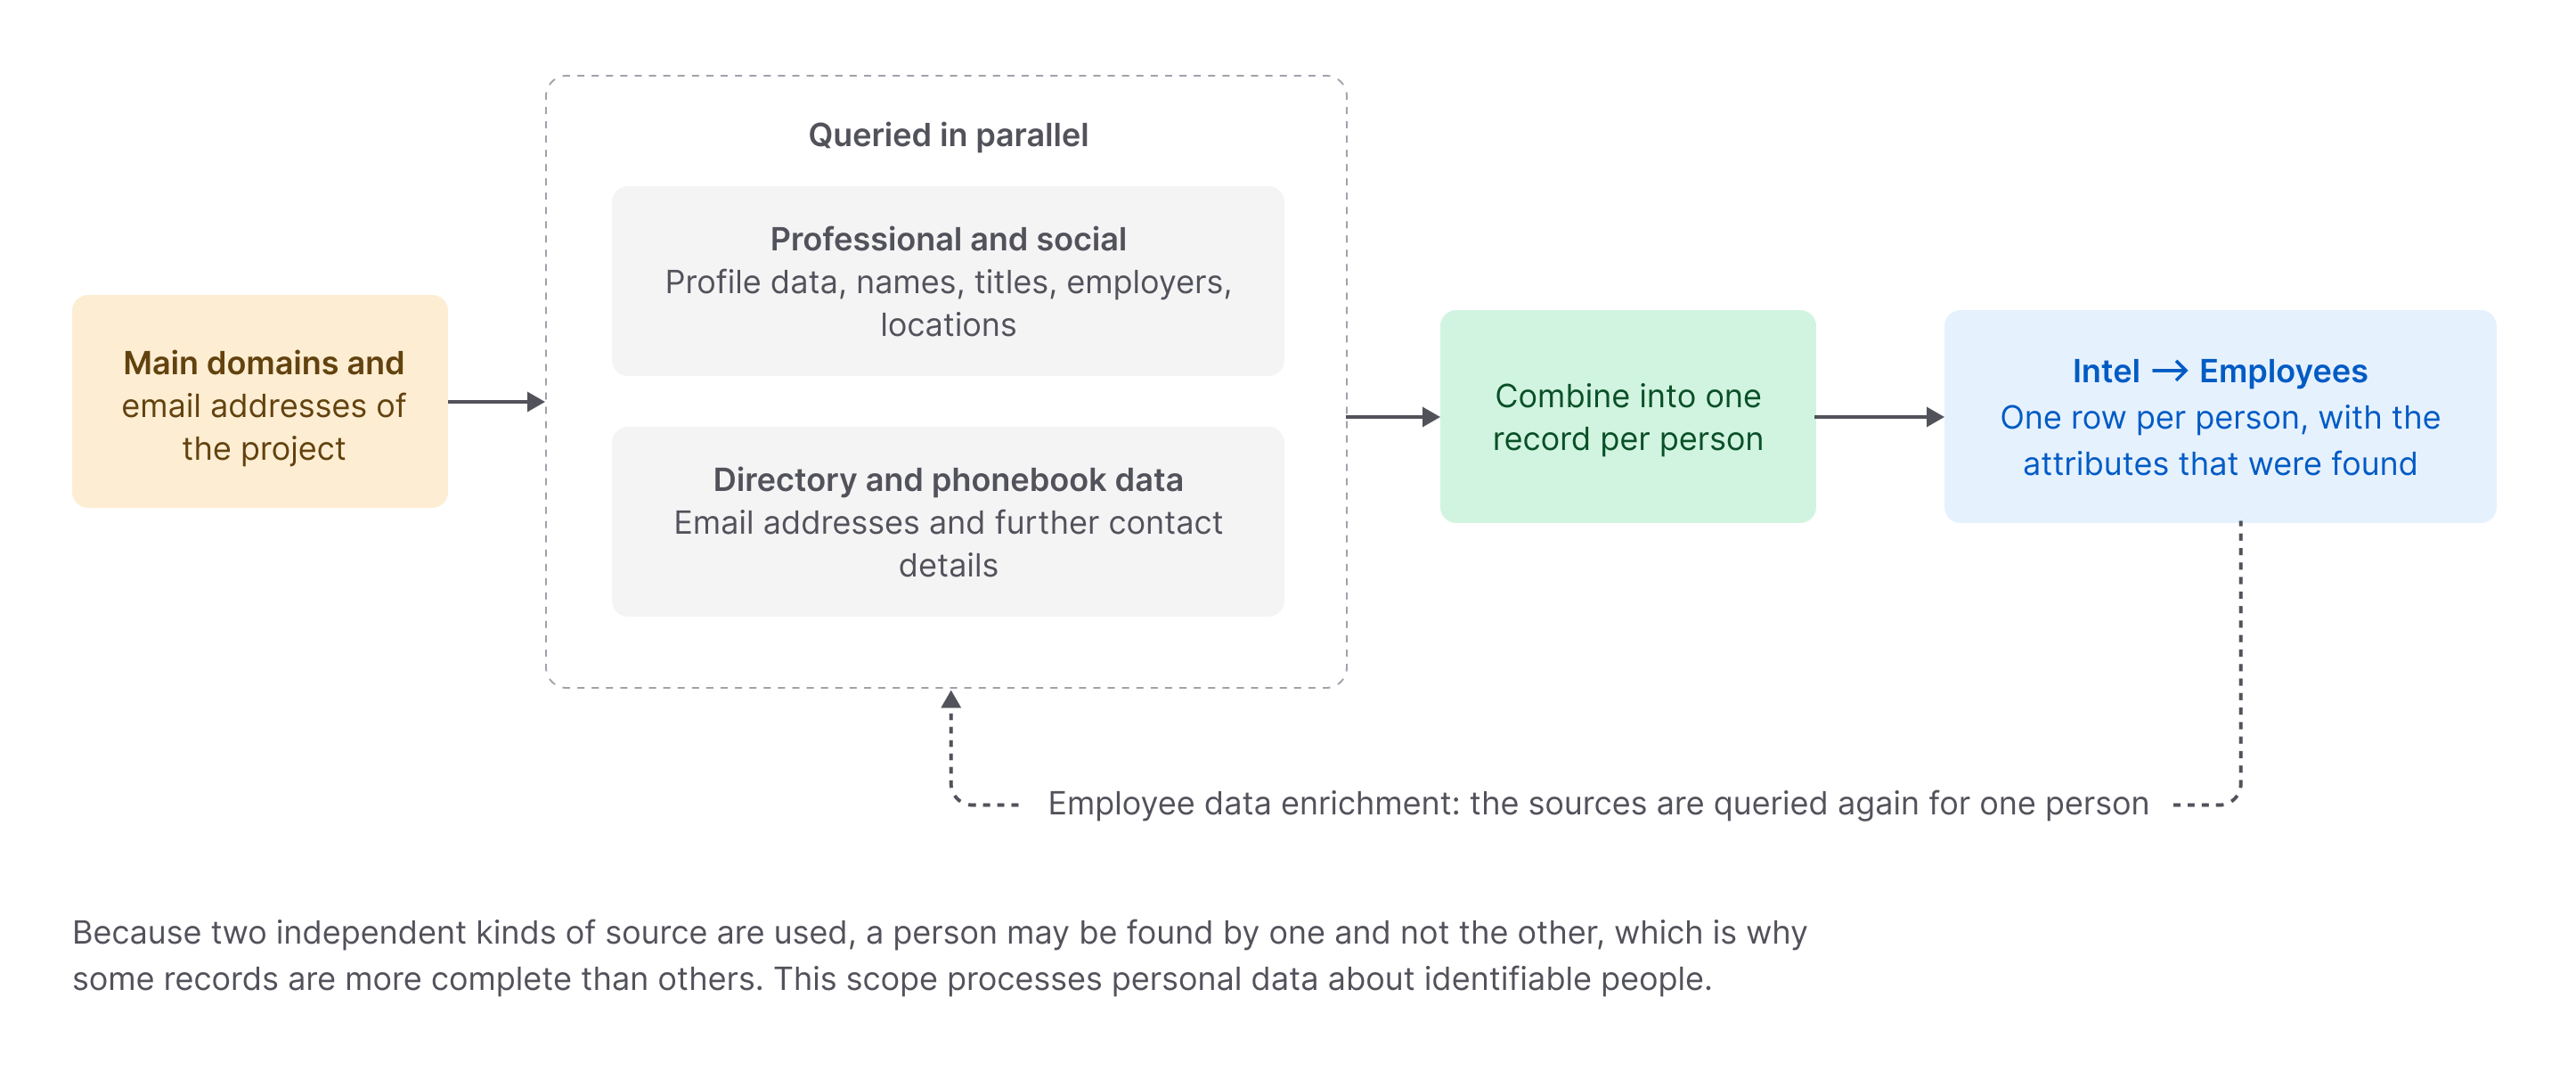 Diagram 8: Employees - two independent kinds of source
Personal data
This scope processes personal data about identifiable people. Restrict project access accordingly and observe your organisation's retention rules. See Intel.
How a finding records its own evidence
Every finding carries the reason it exists, which is what makes assessment possible. In Discovery and on the Matches tab of a service in Assets, you will see:
| Element | Meaning |
|---|---|
| The rule | How the match was made, for example Banner Match, Domain Match, or Body Match. |
| The search term | Which entry of your scope was responsible, shown as a label such as Keyword: example.com. |
| The data field | Where in the data of the system the match occurred. |
Read these three together before confirming or rejecting a finding. A Domain Match on a domain you own is close to certain. A Banner Match on a common word is worth a second look.
Why the result set changes over time
| Observation | Reason |
|---|---|
| The first analysis produces far more discovery findings than later ones. | The first run has the widest unassessed space. Once you have confirmed and blacklisted, later runs report mostly what is new. |
| A project keeps growing for several cycles. | Every confirmed finding becomes a search term, which widens the next analysis. The growth flattens once the scope covers the organisation. |
| A finding you rejected comes back. | It was removed rather than blacklisted. Use Remove and add to blacklist to exclude it permanently. |
| Results appear that clearly belong to a provider. | A keyword matched their data. Blacklist the provider's name; see Scope. |
| A monitoring run reports nothing. | Nothing changed. This is the normal outcome for a stable scope, and is what makes the exceptions meaningful. |