Add search terms
Adding search terms from discovery results
The Discovery view presents assets that the platform has identified as potentially related to your organisation but which have not yet been confirmed as part of your attack surface. By reviewing these findings and promoting the relevant search terms to the project scope, you progressively refine the coverage and accuracy of your analysis.
This article describes how to review discovery findings and add search terms to the scope of an existing project.
Overview of the workflow
The refinement process follows an iterative pattern:
- The platform analyses the current scope and identifies related assets.
- Candidate findings are presented in the Discovery view.
- You confirm relevant findings, which are added to the scope as search terms, or reject irrelevant findings, which are added to the blacklist.
- The platform re-analyses the extended scope and identifies further assets.
Each confirmed search term therefore broadens the analysis, while each blacklisted term prevents recurring false positives.
Prerequisites
Before you begin, please ensure that:
- an existing project is available and an initial analysis has been completed;
- you are familiar with the assets, brands, and network ranges belonging to your organisation, so that findings can be assessed reliably;
- your plan provides sufficient remaining resource capacity for additional search terms.
Step 1: Open the discovery view
Open the relevant project and select the Discovery tab. The findings are grouped into five categories, each shown as a separate sub-tab with the corresponding number of open items:
| Category | Content | Typical search terms to be derived |
|---|---|---|
| Services | Identified network services, including IP address, protocol, port, and service banner. | Whois description, Whois netname |
| Domains | Domain names identified through certificate data, rDNS, or keyword searches. | Domain names (FQDN) |
| Certificates | TLS certificates, including subject and issuer attributes. | Subject CN, Subject organization, Issuer CN, Issuer organization |
| Whois | Whois records for identified IP ranges, including contact and abuse data. | Net name, description, abuse email, abuse domain |
| AS | Autonomous systems associated with identified IP ranges. | AS name, organization name |
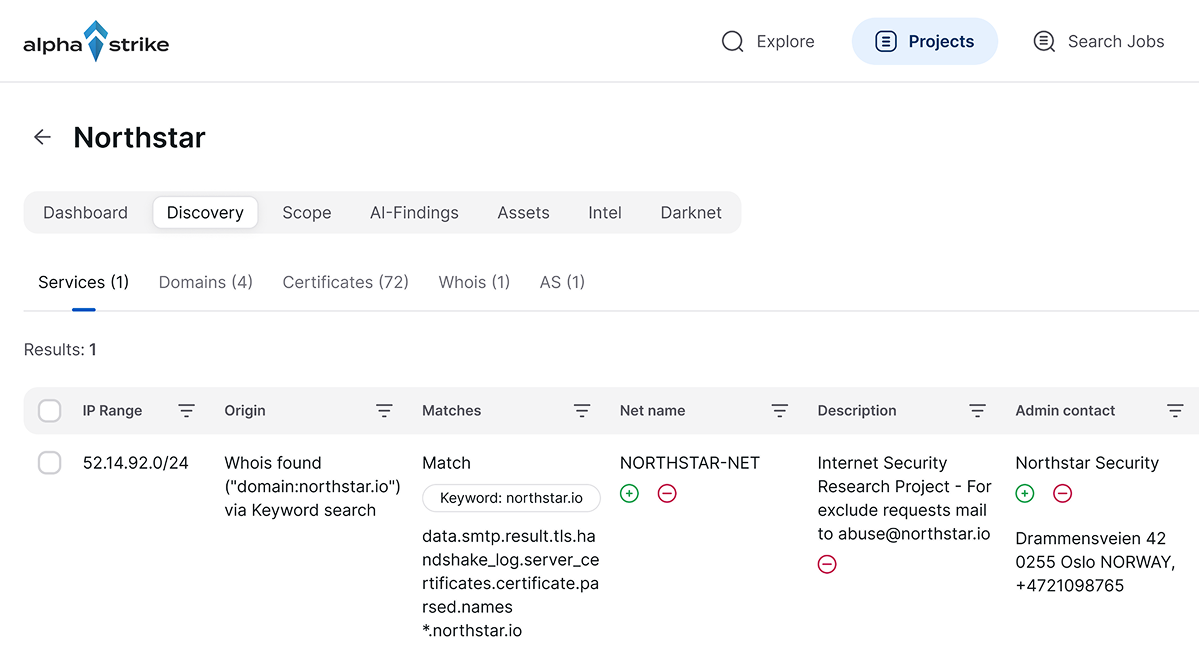 Figure 1: Discovery view - Services
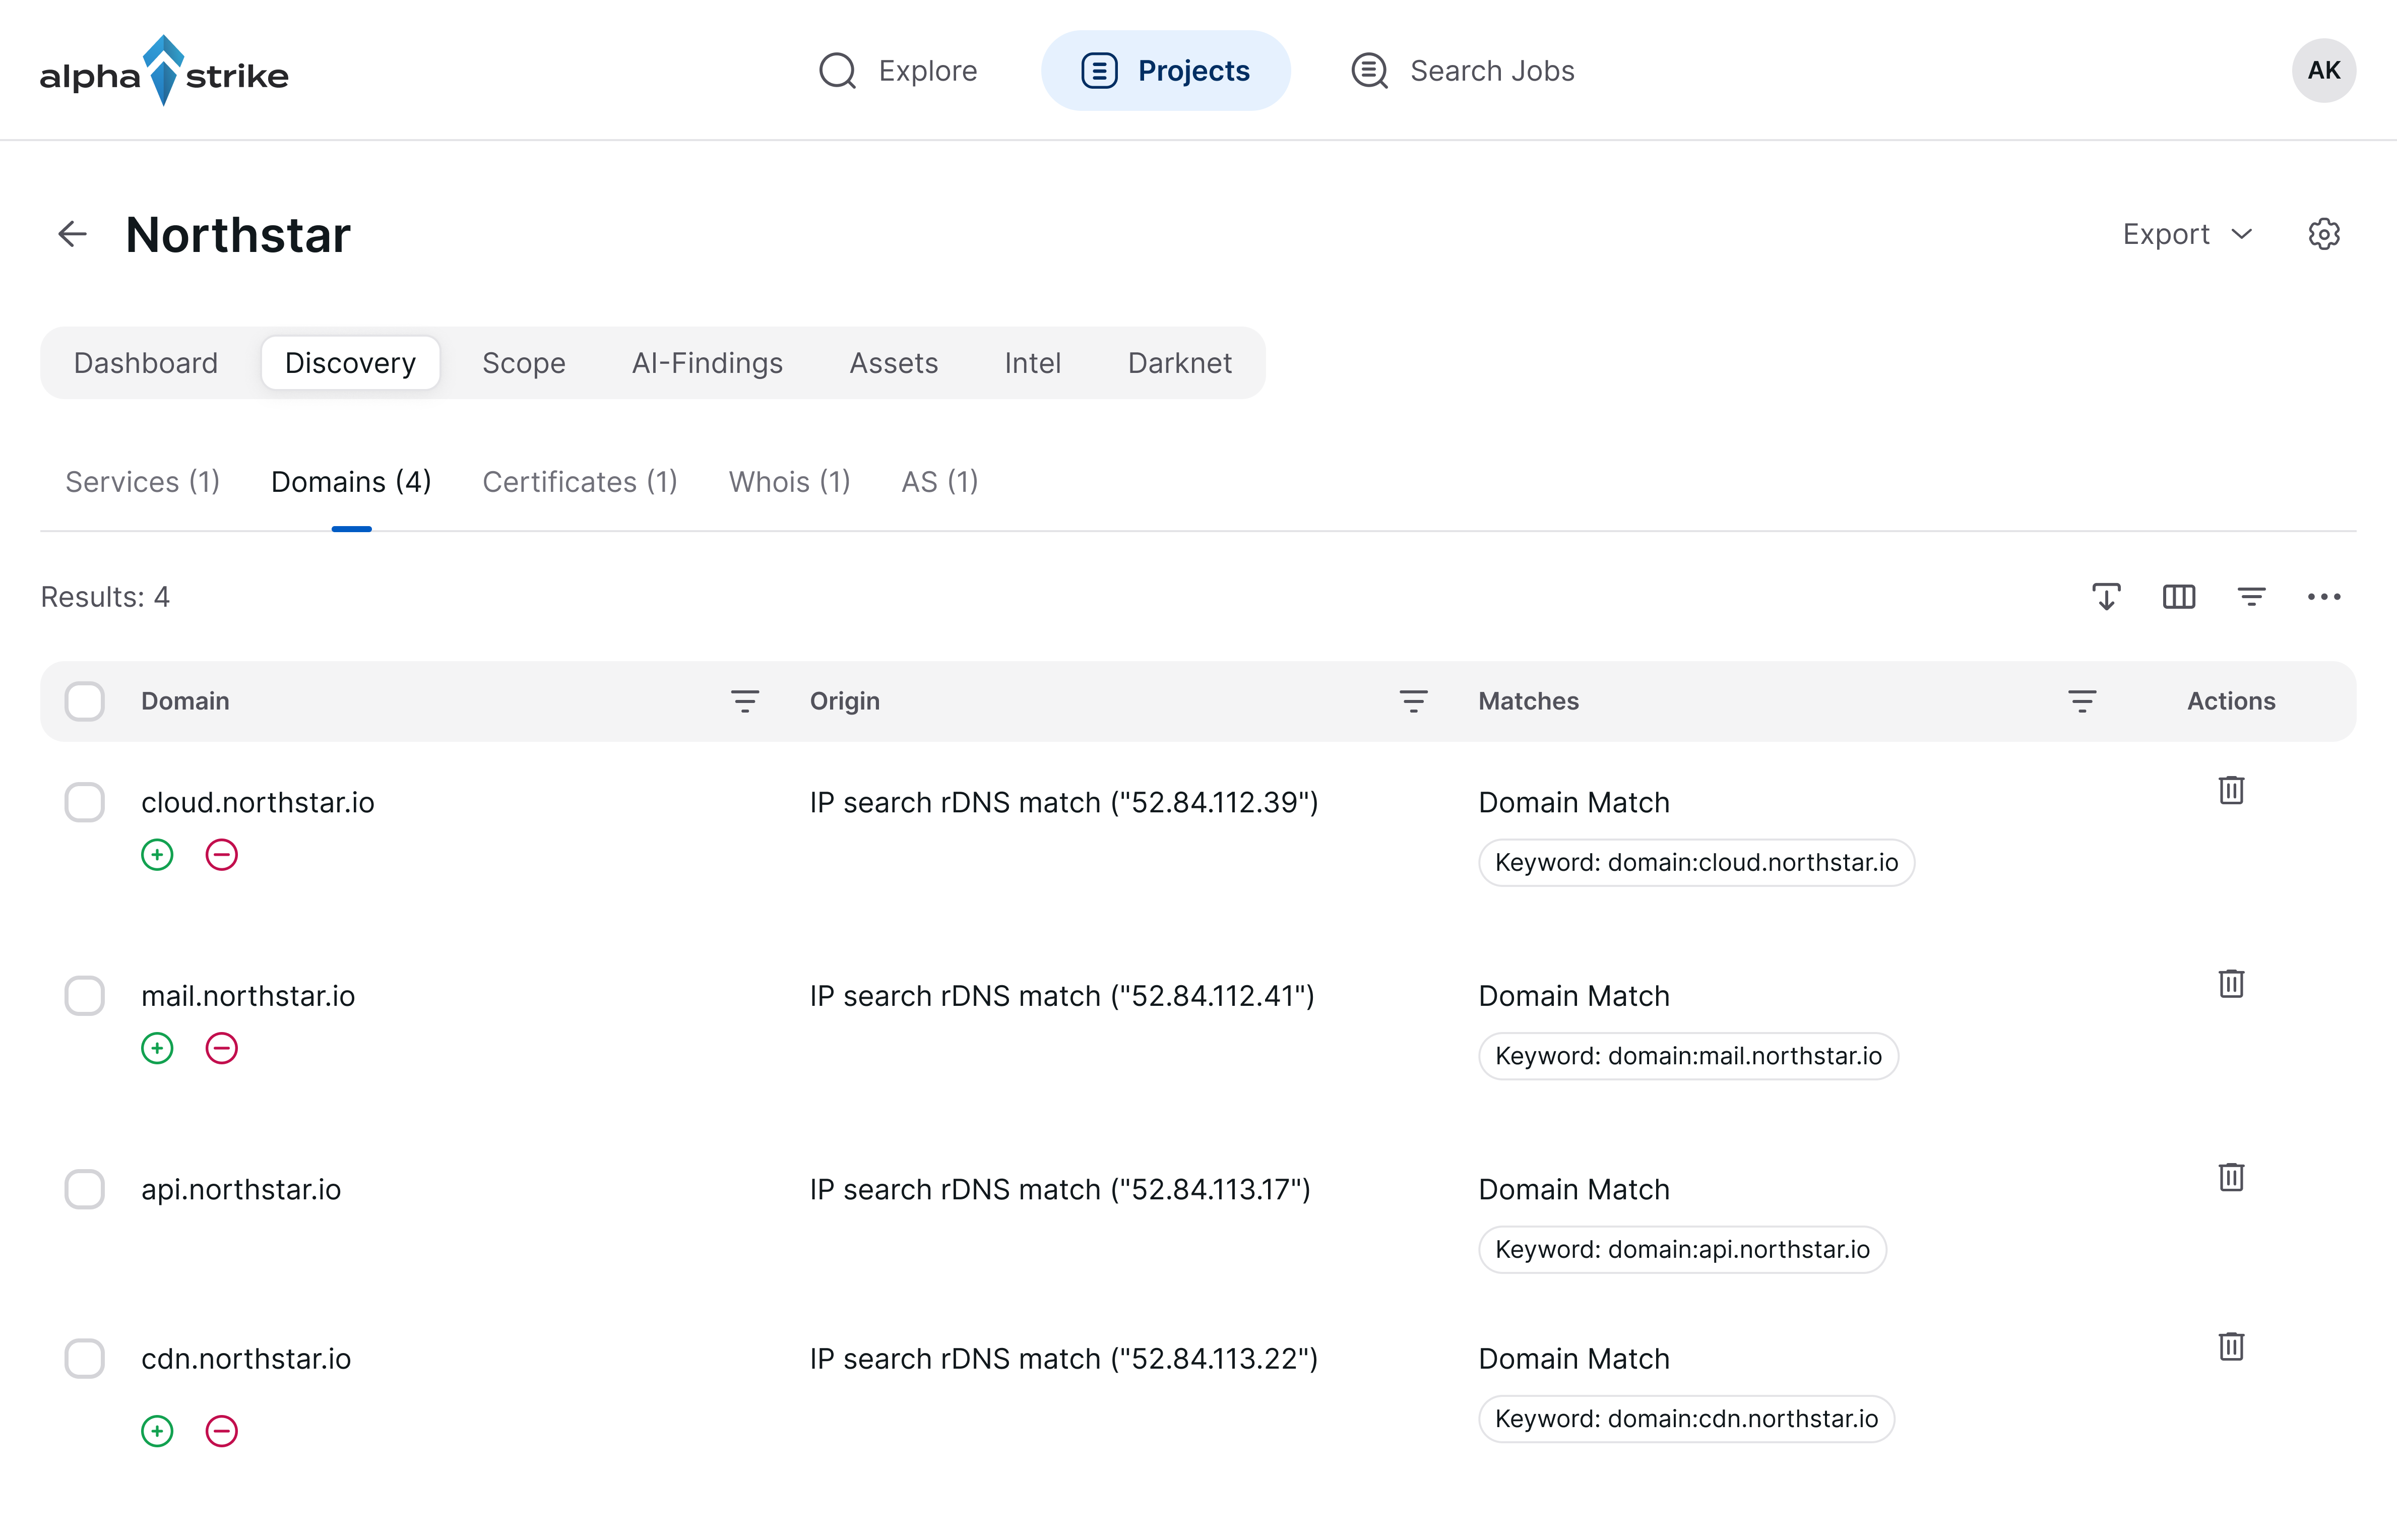 Figure 2: Discovery view - Domains
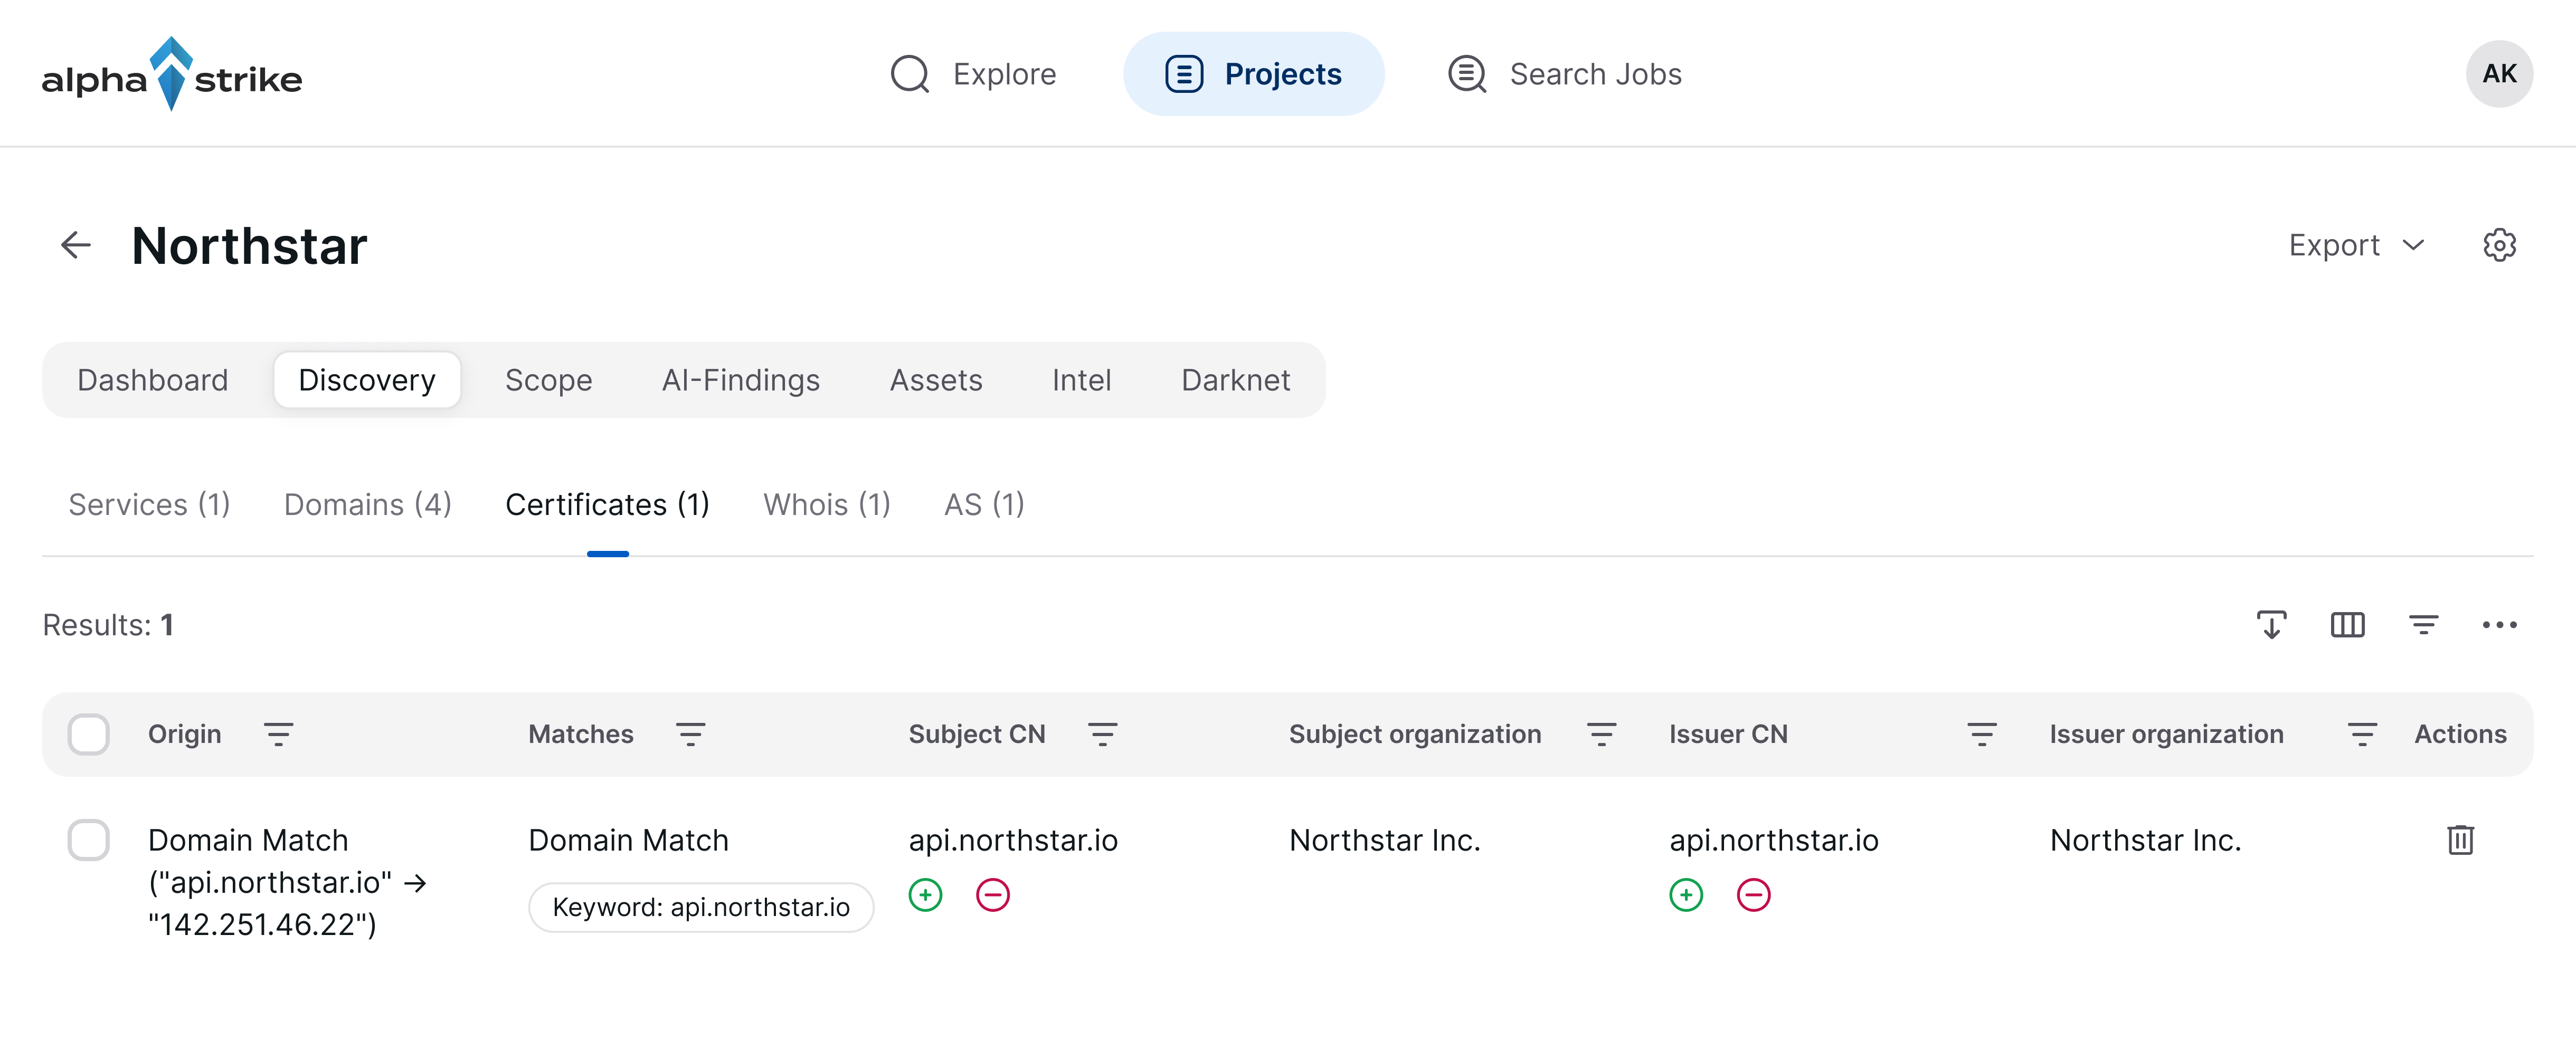 Figure 3: Discovery view - Certificates
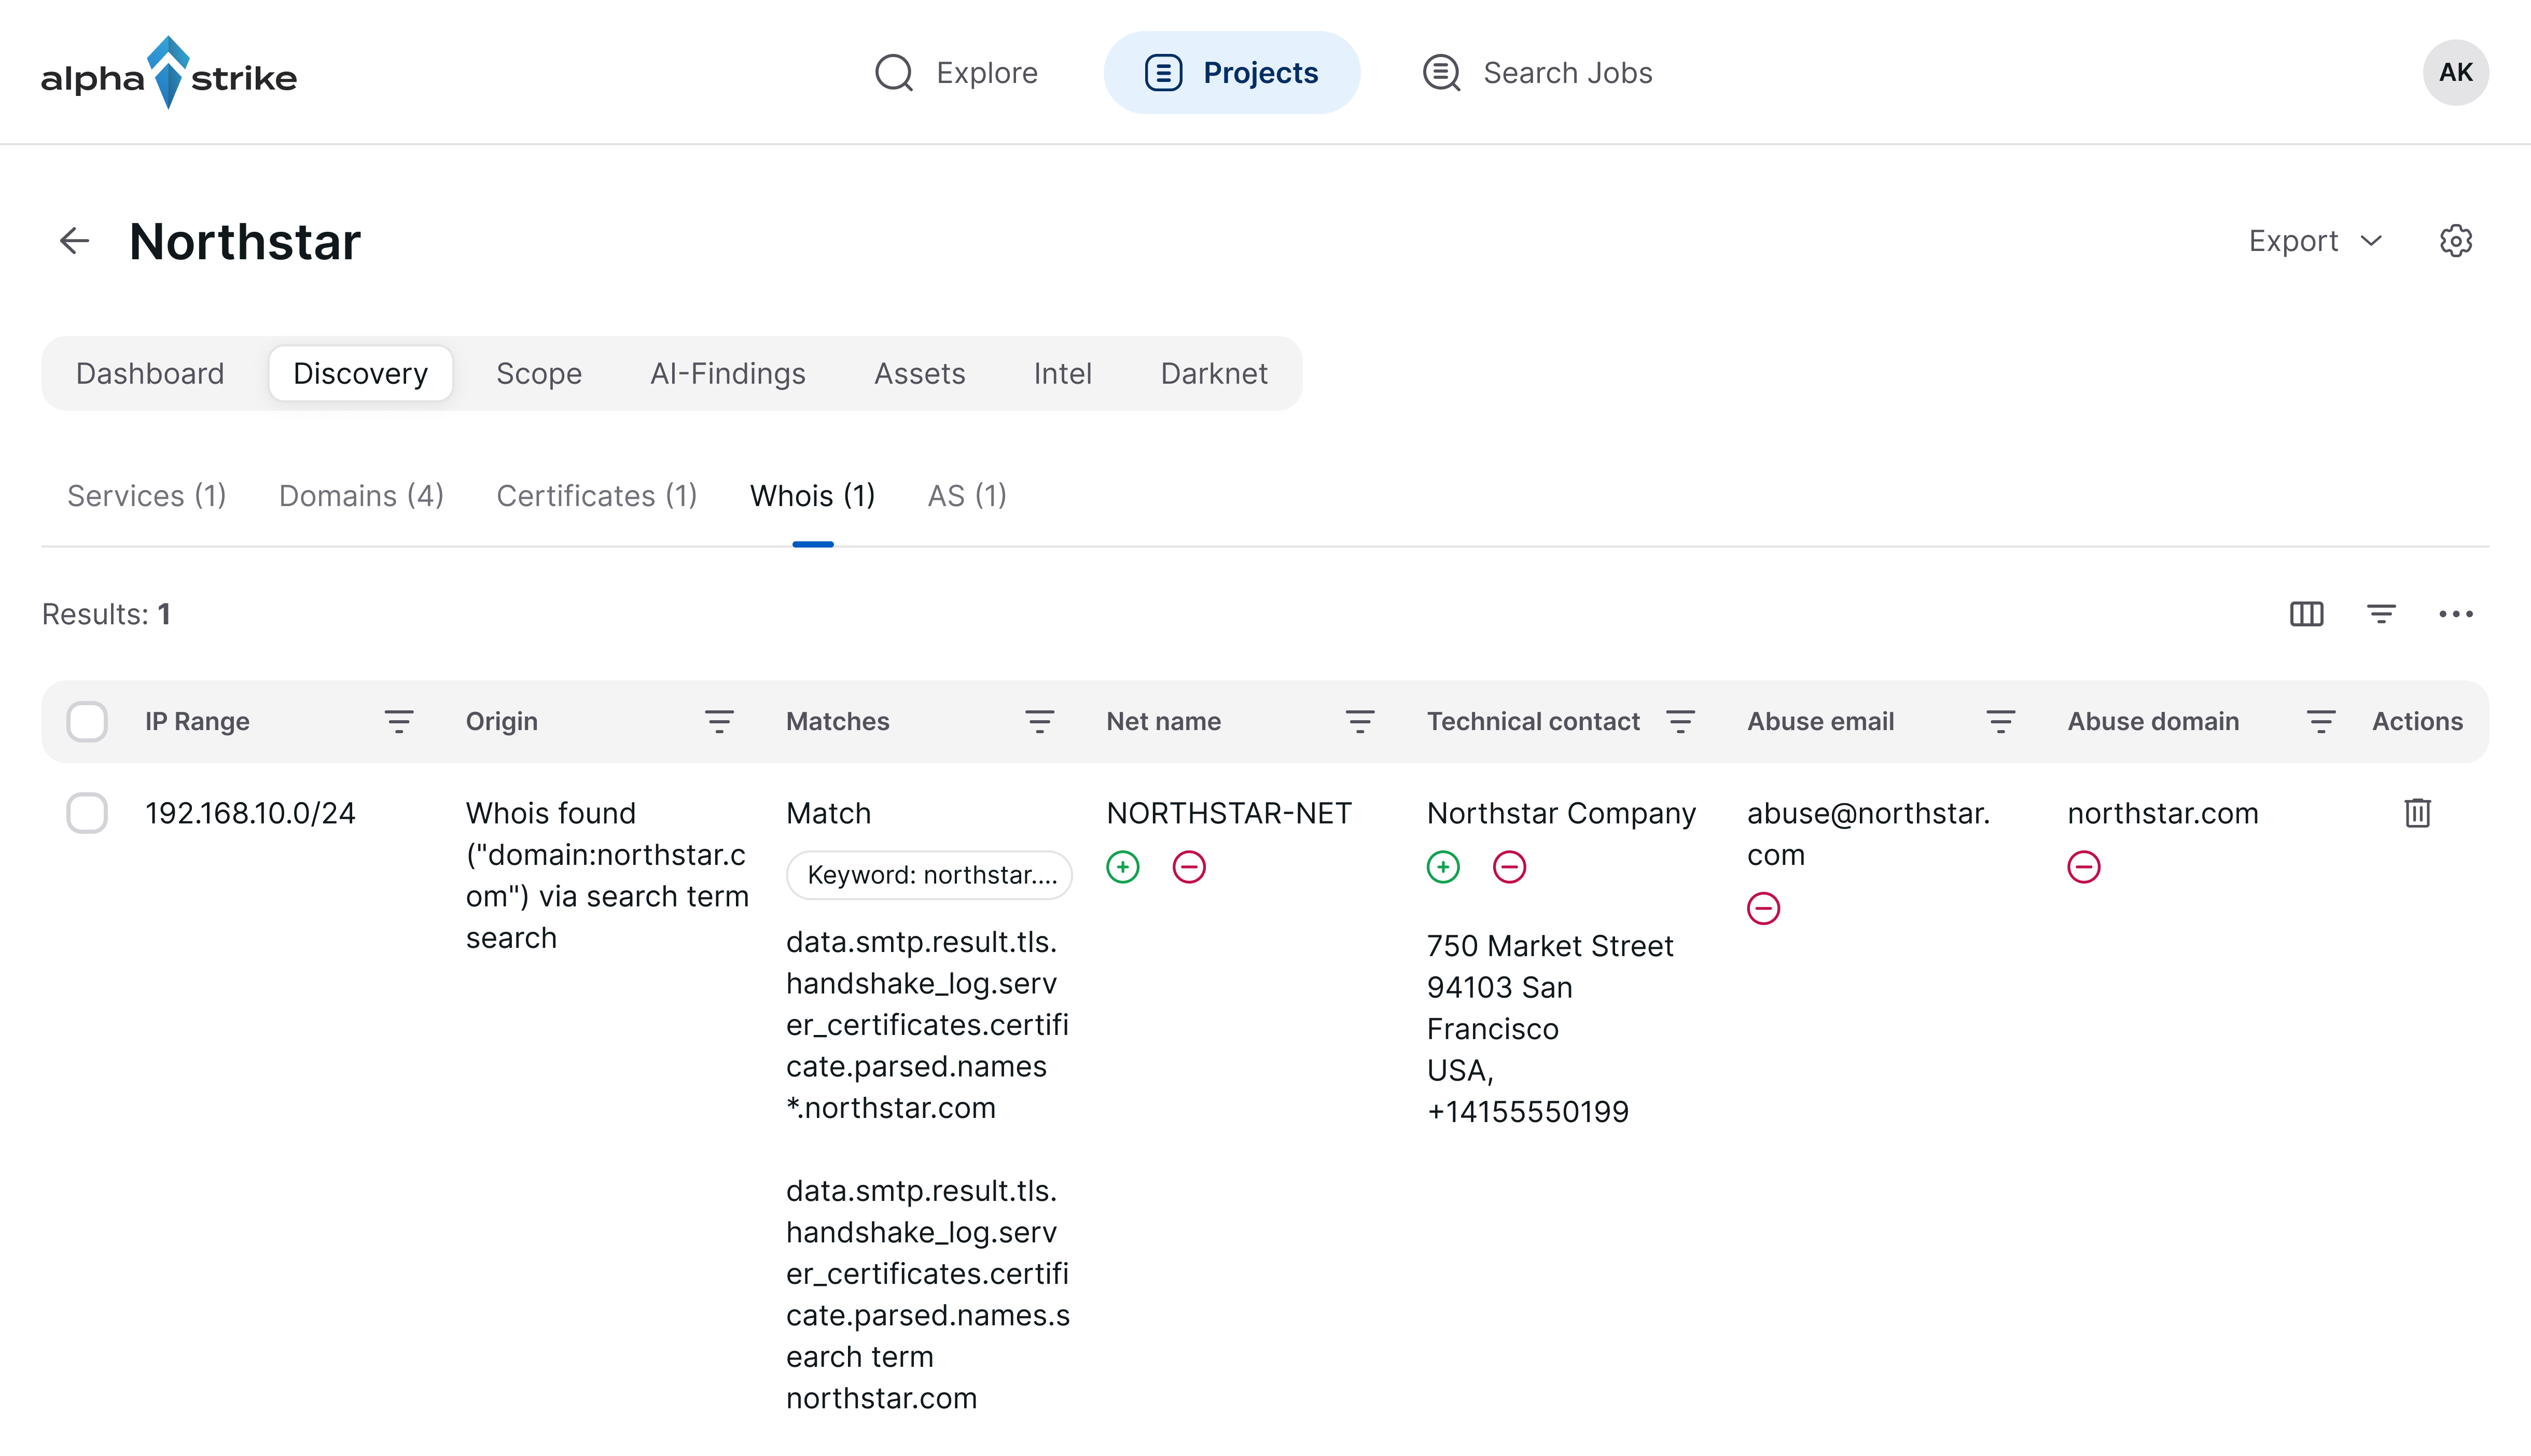 Figure 4: Discovery view - WHOIS
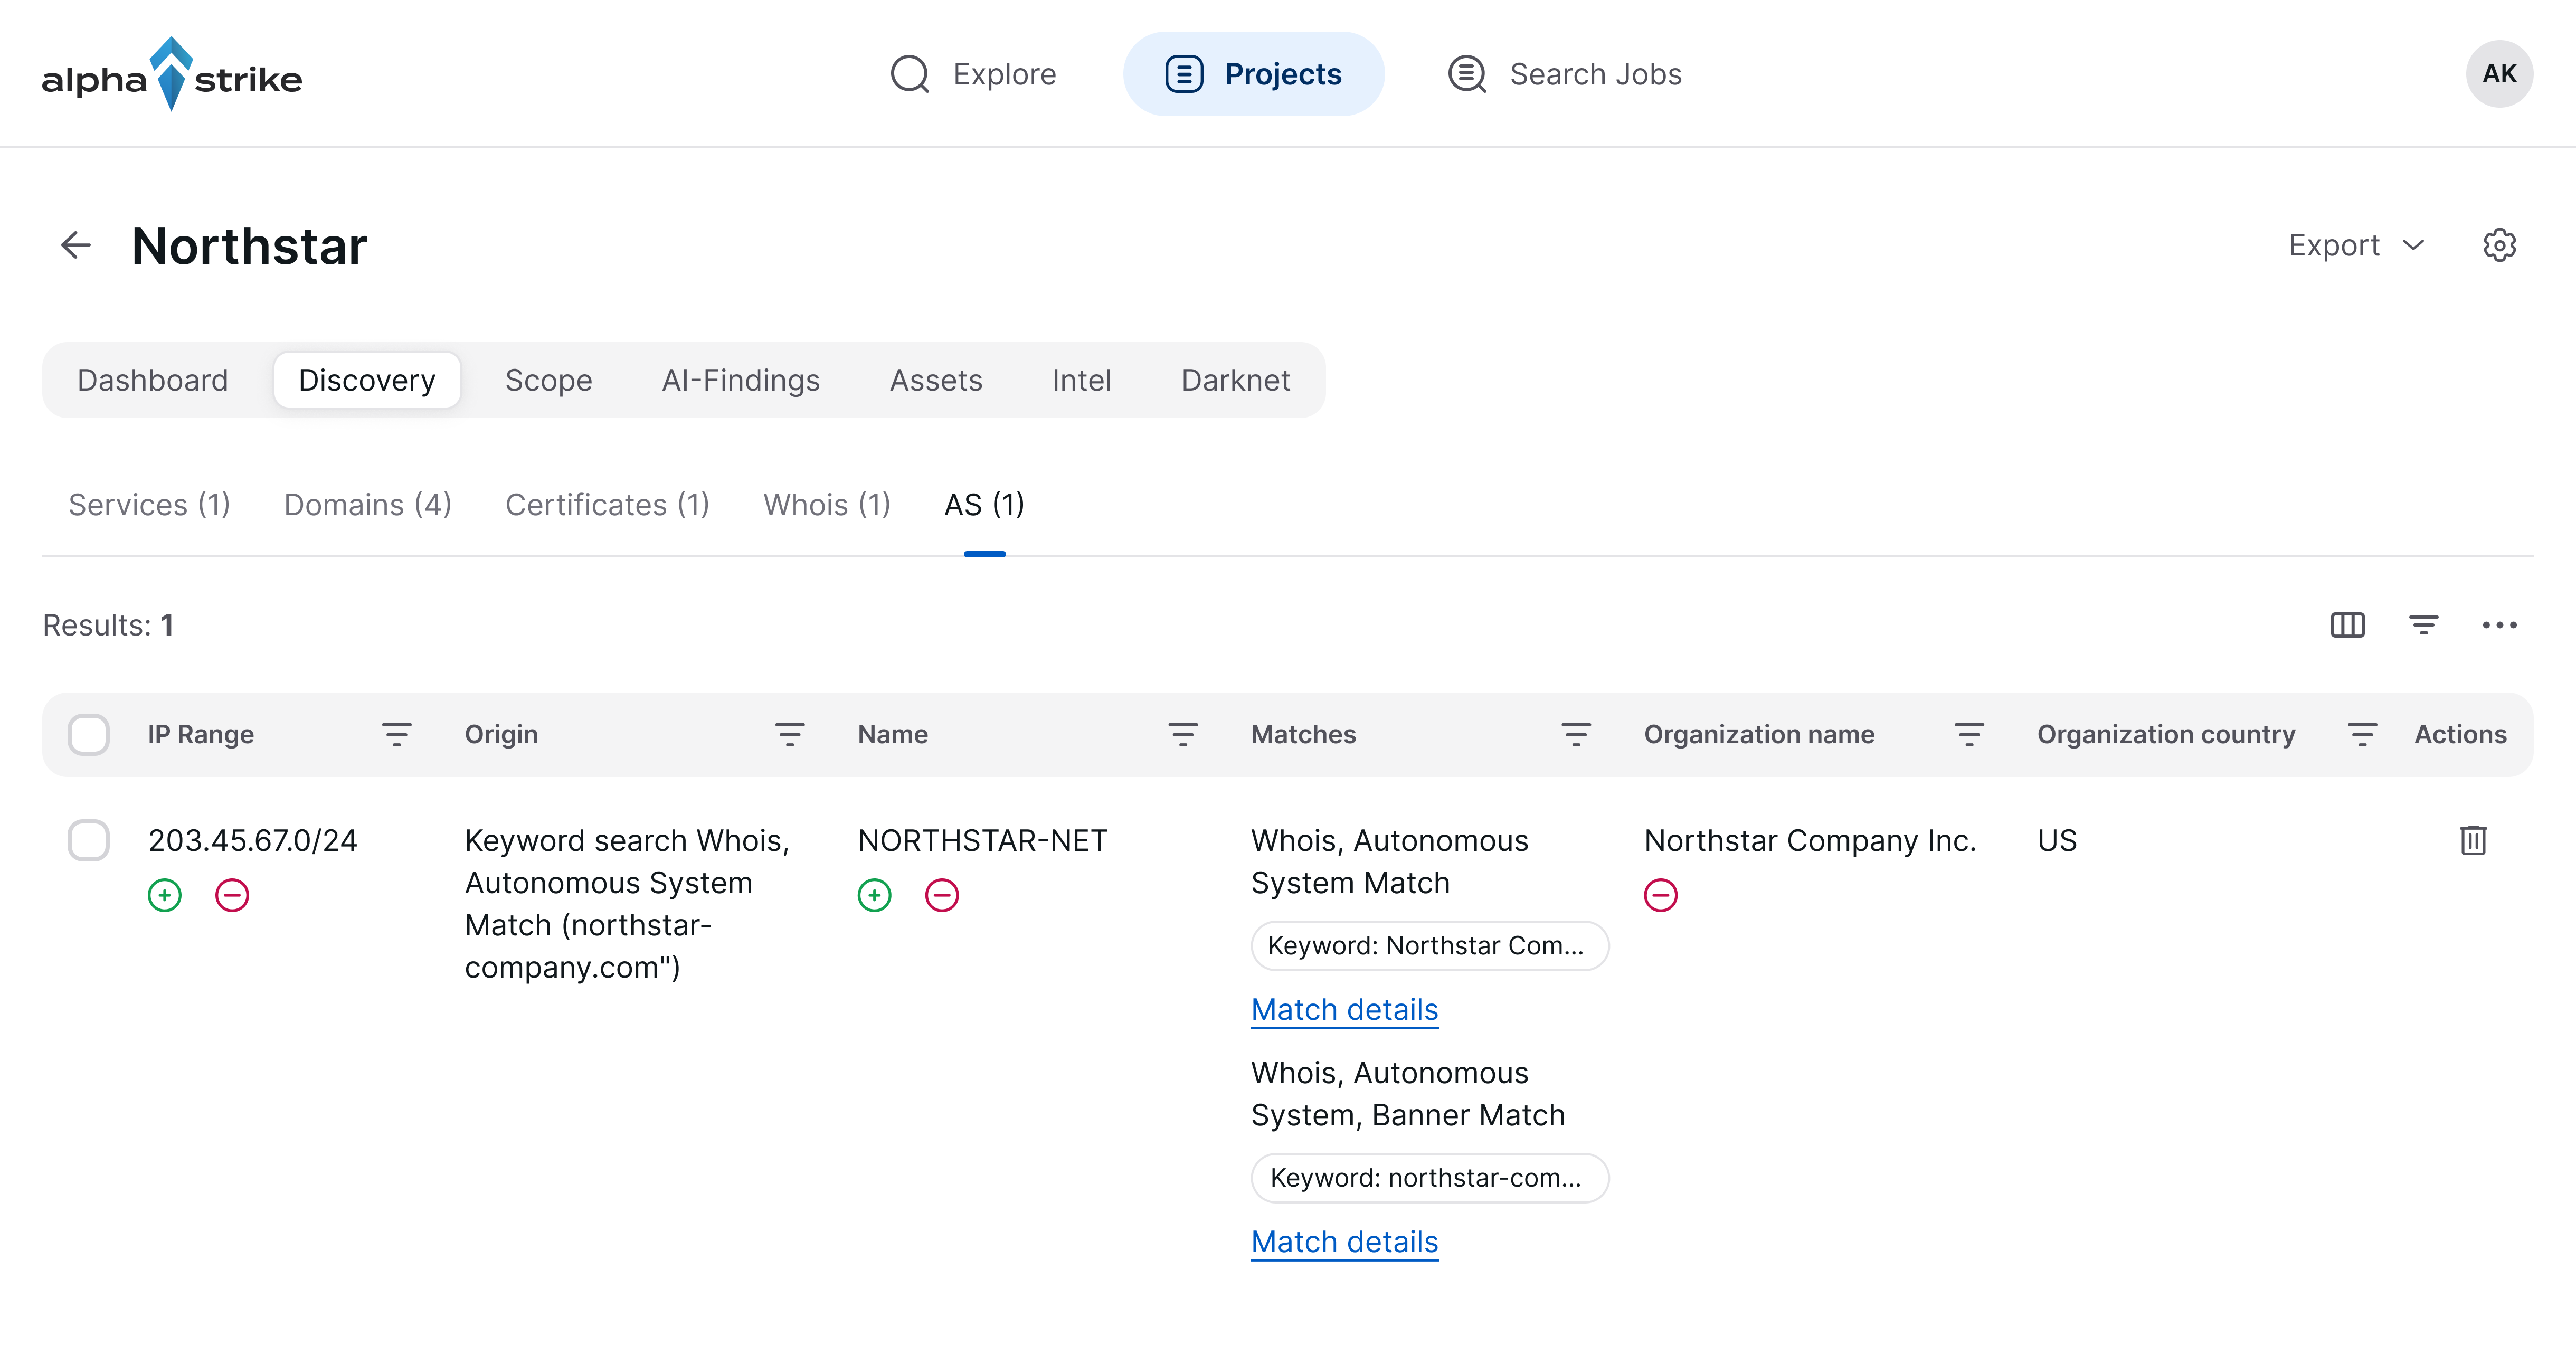 Figure 5: Discovery view - AS
Step 2: Assess the findings
Each row documents the origin of the finding. Please note the following elements when assessing a result:
- The Origin column indicates how the finding was identified, for example
Keyword search rDNS match ("34.160.33.139")orDomain search Domain Match. - The Matches column lists the matching rule, the responsible keyword (displayed as a label, for example
Keyword: example.com), and the relevant data field, for exampledata.tls.result.handshake_log.server_certificates.certificate.parsed.names. - Select Show full text to display the complete matched value where the excerpt has been truncated.
Use the column filters and the column selection control in the upper right area of the table to restrict the result set to the attributes relevant to your assessment.
Recommended assessment criteria
Confirm a finding if the value clearly identifies your organisation, for example, a company name, a brand, a domain you own, or a network range registered to your organisation. Reject findings that identify a third party, such as a hosting provider, a content delivery network, or a certificate authority, as these would introduce assets outside your responsibility.
Step 3: Add an individual search term
Each value that can be promoted to a search term is accompanied by two controls:
| Control | Tooltip | Effect |
|---|---|---|
| Green plus | Add to project | Adds the value to the project scope as a search term. |
| Red minus | Remove and add to blacklist | Removes the finding and adds the value to the blacklist, preventing it from reappearing. |
Select the green plus next to the relevant value. The Add search term · General dialogue opens at Step 1 of 2 and displays the value in an editable Search term field.
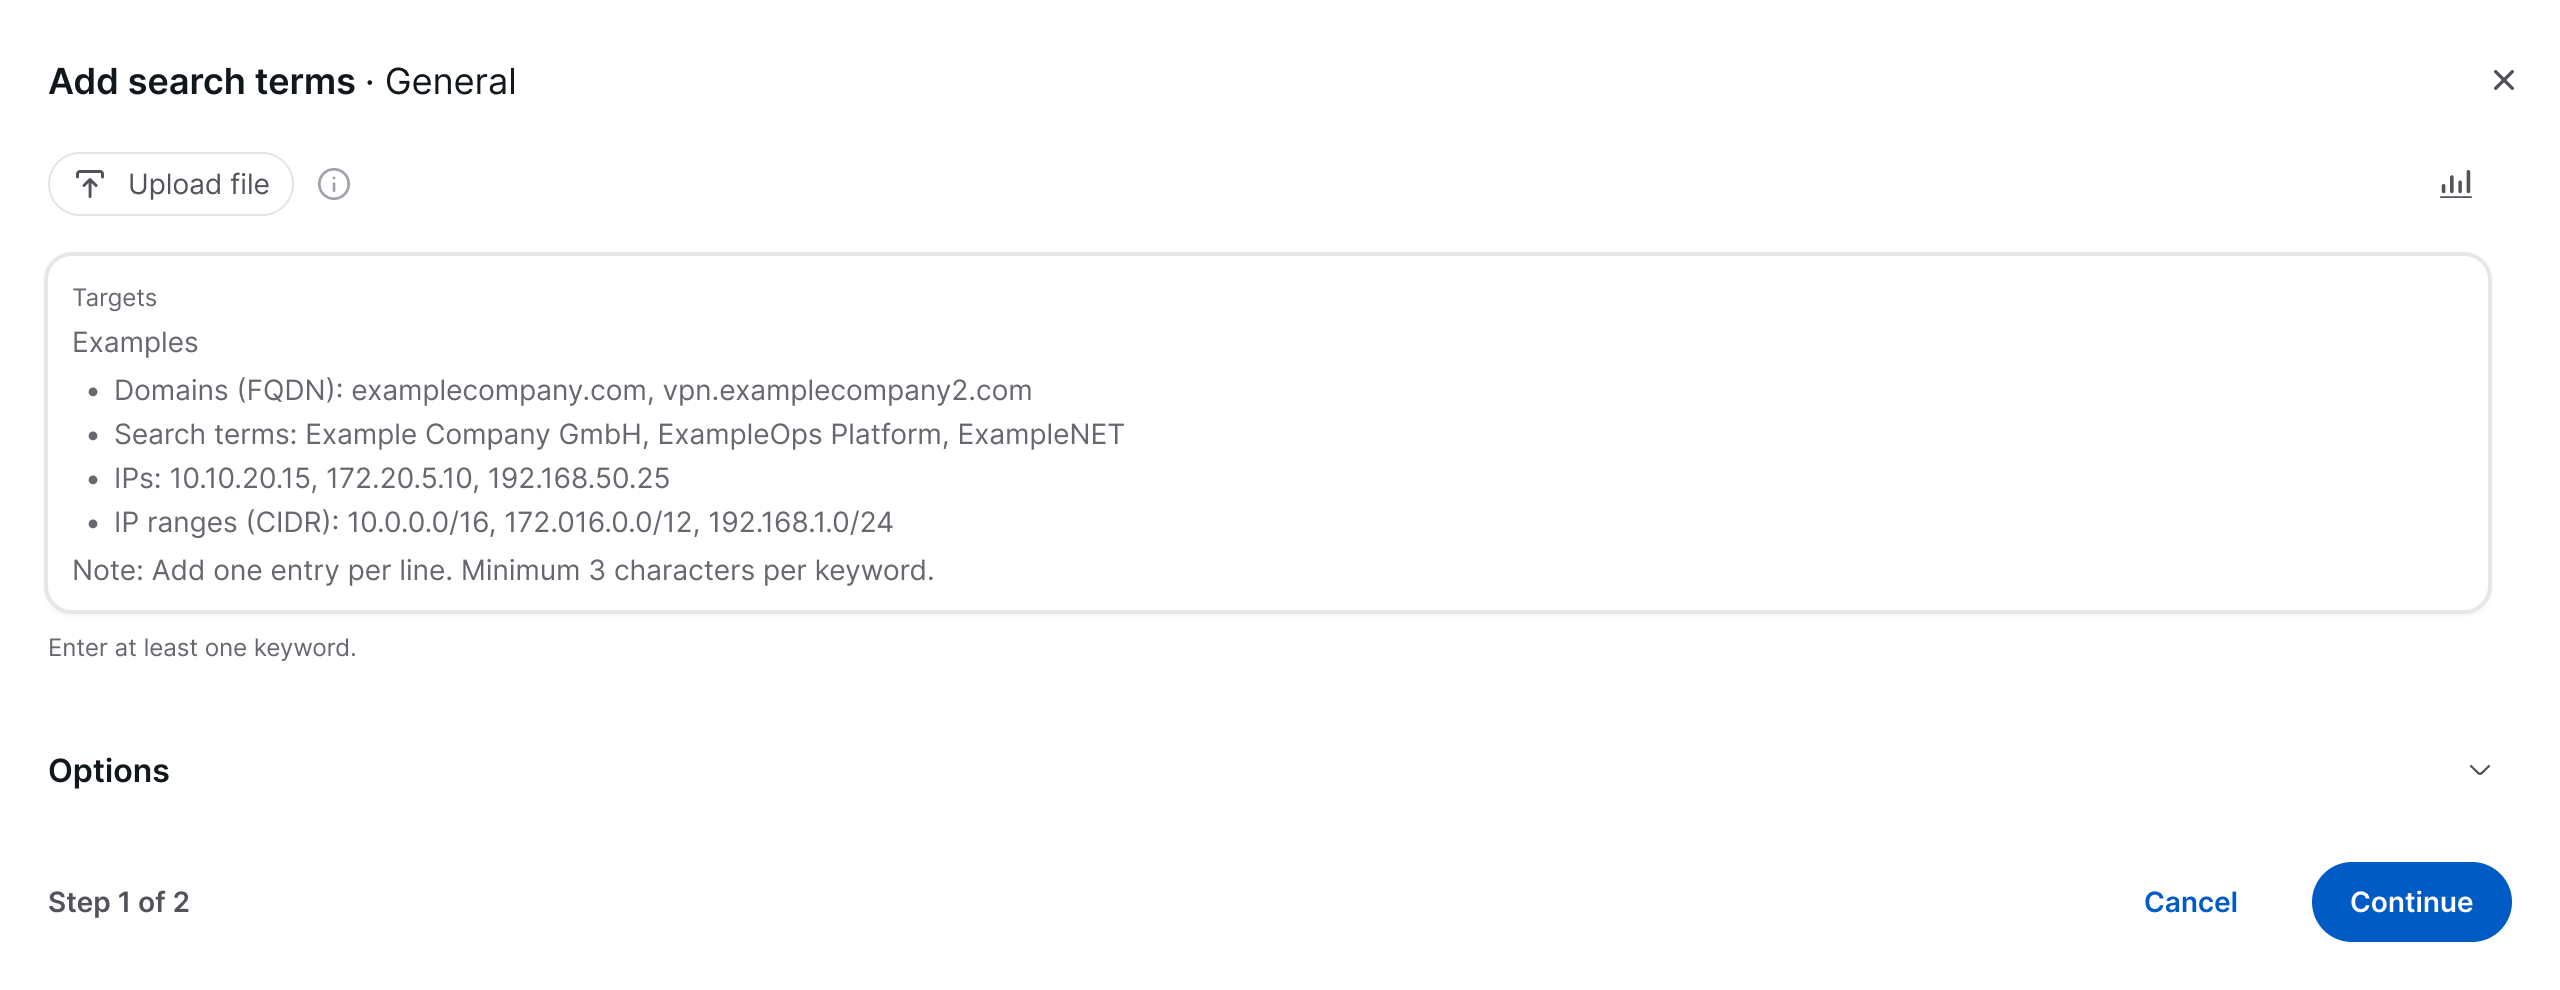 Figure 6: Add search term - General (Step 1 of 2)
Review the value and amend it if required, for example, by shortening a company designation to its distinctive component or by generalising a host name to the corresponding domain. Select the resource limits control in the upper-right area of the dialogue to verify the remaining capacity of your plan before confirming.
Select Continue to proceed to Step 2 of 2 · Scope options. This step lists every entry with the type detected by the platform and the search scope that will be applied, and allows the entry to be amended before it is written to the project:
| Column | Content |
|---|---|
| Target | The value to be added. Select the pencil control to correct it in place, then confirm with the tick. |
| Type | The type detected by the platform, for example Domain, Email, Keyword, IPv4 Address, or IPv4 Range. Administrators can also classify a valid top-level domain as TLD. |
| Search scope | The sources to be analysed. Domain and administrator-created TLD entries can use Attack surface, Darknet, and Employees. Email entries can use Darknet and Employees. The exact options depend on the company plan. Keywords, IP addresses, and IP ranges are fixed to Attack surface. |
| Actions | Controls to amend or remove the individual entry. Selecting one or more row checkboxes additionally provides a control for removing the selected entries together. |
Blocking validation
Entries that cannot be added are reported in red in the Search scope column, for example Covered by example.com in this project in the search terms section. The Add button remains inactive until every affected entry has been corrected or removed.
Select Add to apply the change. A confirmation message (Search terms added) is displayed.
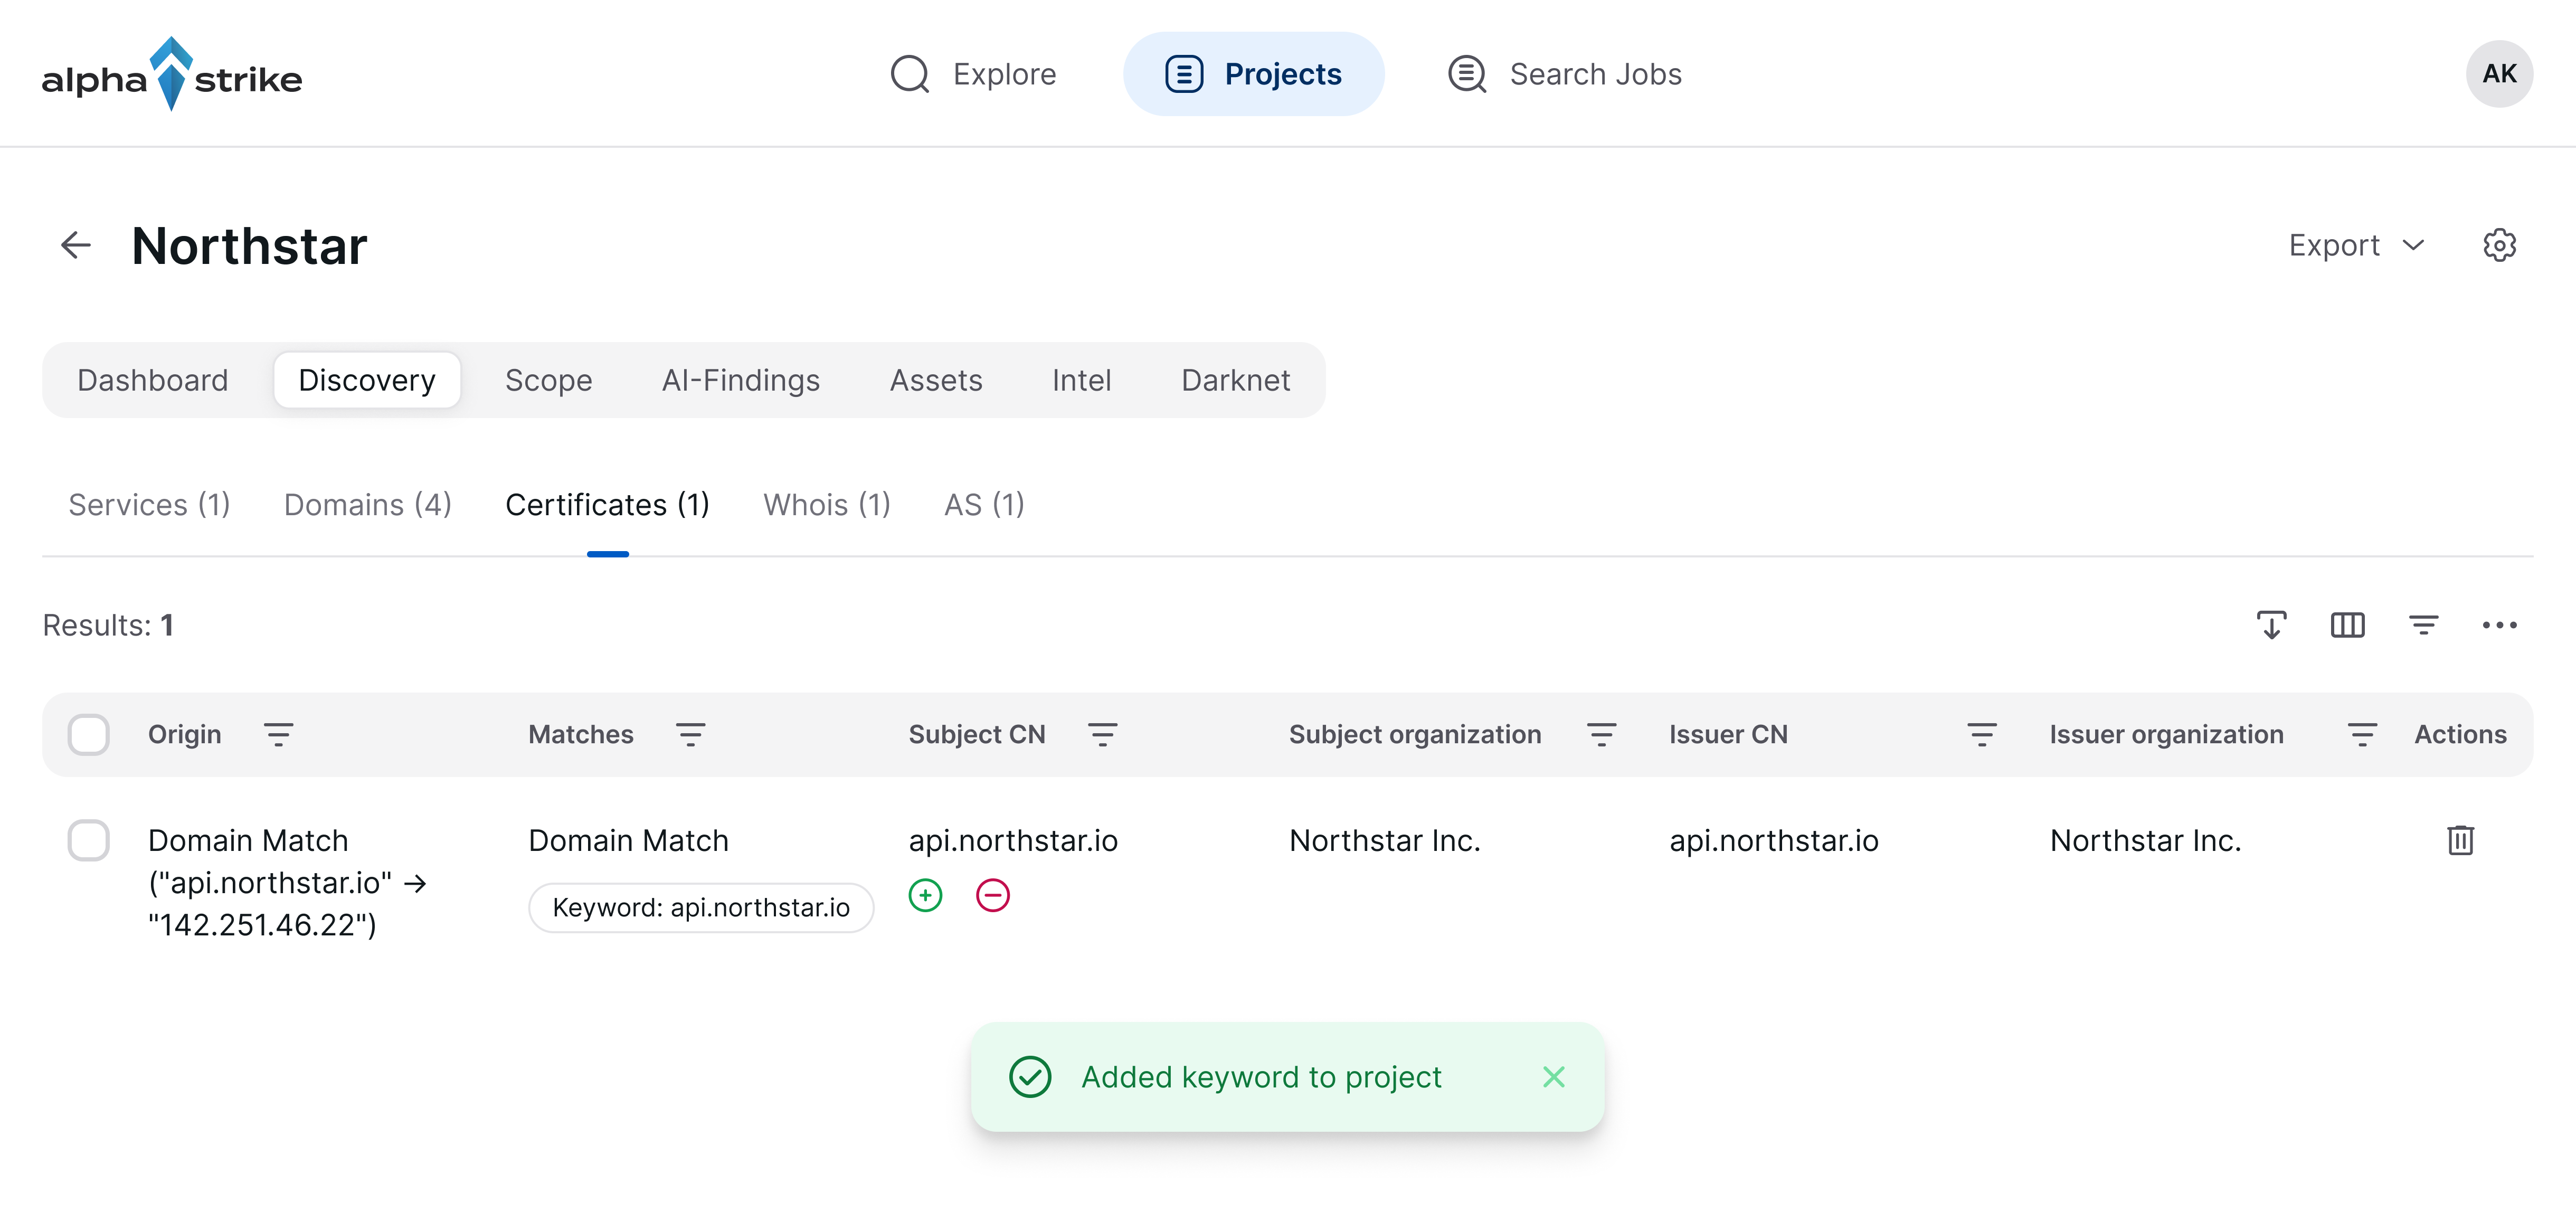 Figure 7: Confirmation of the added search term
Findings
Confirmed findings are removed from the Discovery list, as they are no longer pending assessment. The number of open findings in the sub-tab therefore decreases. Related findings covered by the same search term are resolved in the same operation, which may reduce the count by more than one.
Step 4: Add multiple search terms simultaneously
Where several findings are to be processed together, activate the checkbox at the beginning of each relevant row. An action bar appears in the upper right area of the table providing the following operations:
| Action | Effect |
|---|---|
| Add selected to project | Adds the selected findings to the project scope. |
| Remove selected and add to blacklist | Removes the selected findings and adds the corresponding values to the blacklist. |
| Delete selected | Removes the selected findings without adding them to the blacklist. Identical findings may reappear in subsequent analyses. |
The number of selected rows is indicated in each tooltip, for example Add selected to project (1).
Selecting Add selected to project opens the Add services to project · General dialogue at Step 1 of 2, with the selected values pre-filled in the Search term field, one entry per line. The entries may be amended there before you select Continue and confirm them in Step 2 of 2 · Scope options, as described in Step 3.
We recommend using bulk operations only where the selected findings have been assessed individually beforehand, as the scope of a project directly determines the volume of subsequent analysis.
Step 5: Verify the updated scope
Open the Scope tab to review the result. The tab comprises three sub-tabs:
| Sub-tab | Content |
|---|---|
| Search terms | All active search terms of the project, each classified by type, for example, Domain, Email, Keyword, IPv4 Address, or IPv4 Range, together with the Search scope applied to it. Administrator-created TLD entries are shown as TLD. |
| Blacklist | Values excluded from the analysis. |
| Removed services | Services that have been removed from the project. |
The newly added search terms appear in the Search terms list, and the total in the tab label is updated accordingly. Select Copy all search terms in the Search term column header to copy the complete list to the clipboard.
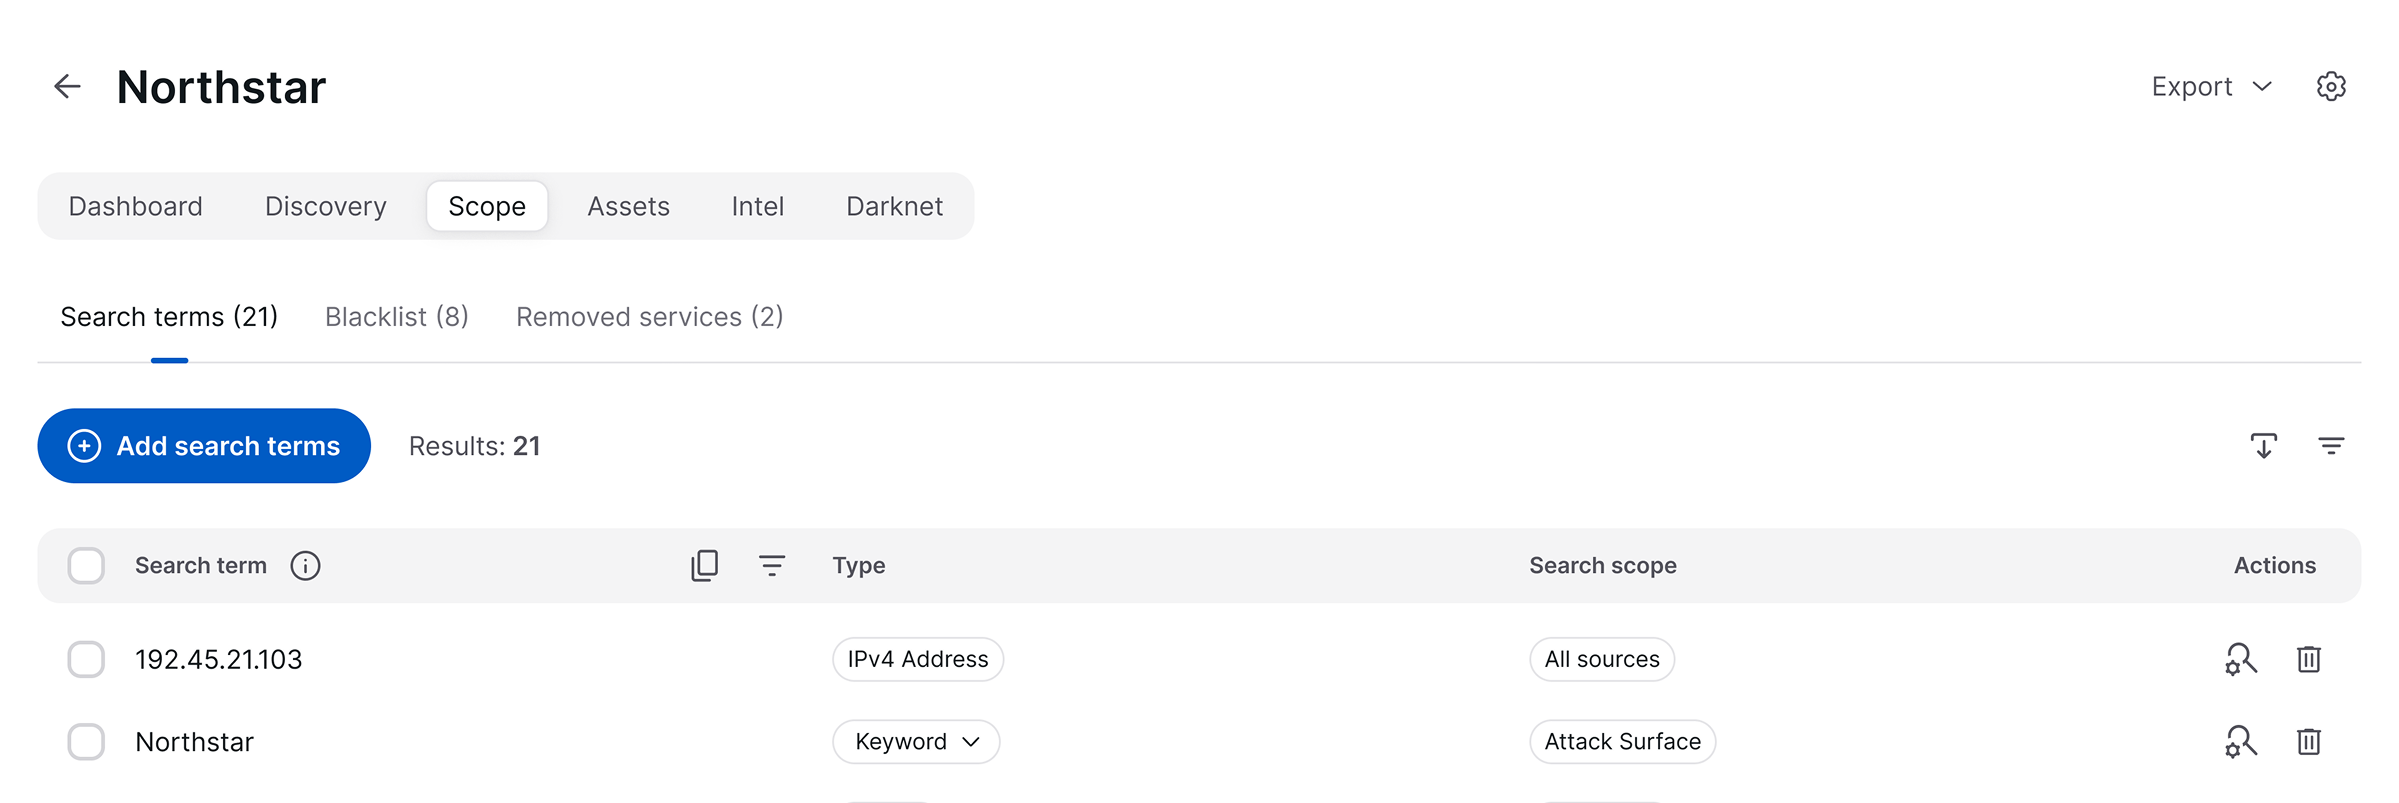 Figure 8: Scope - Search terms
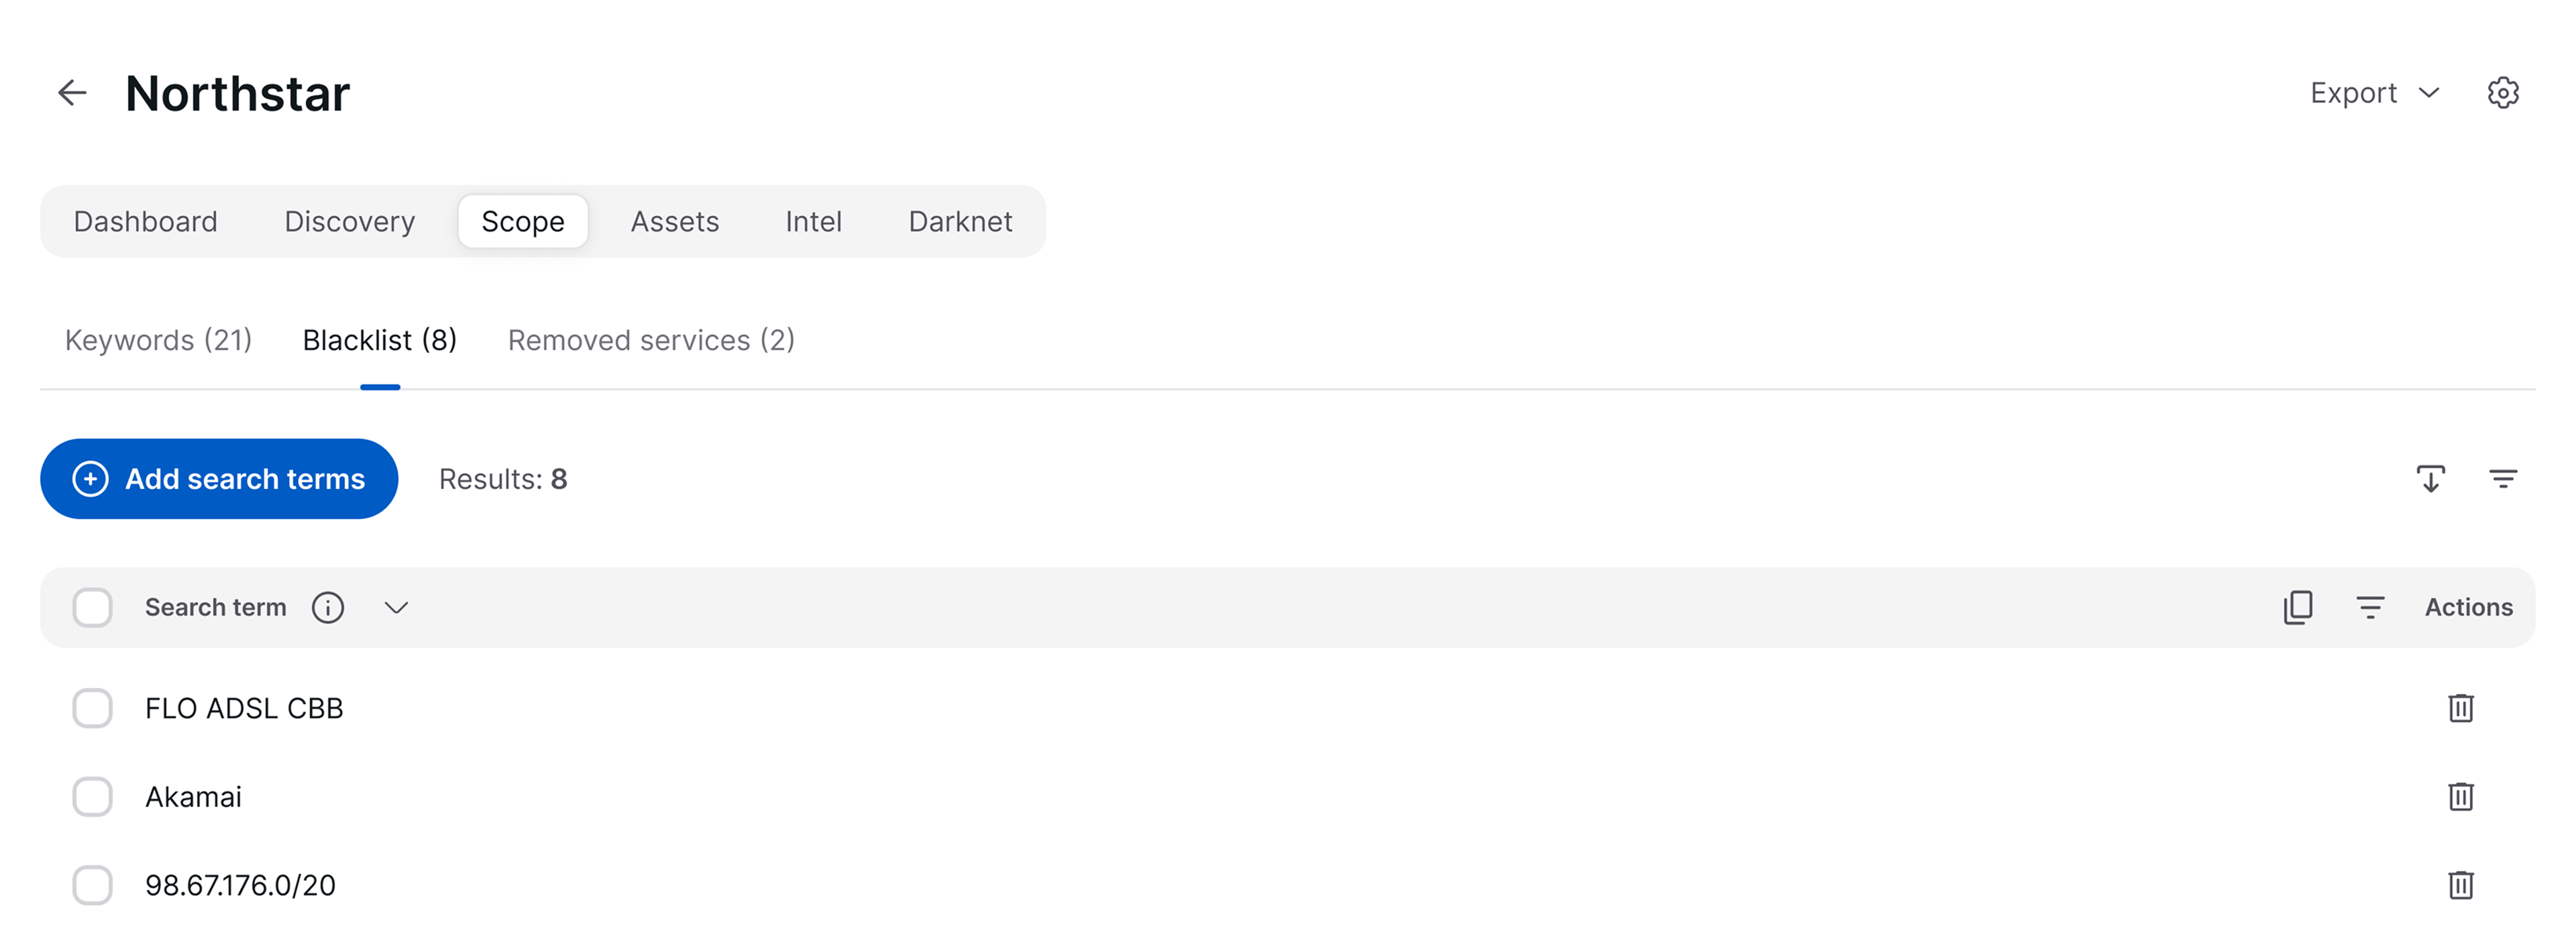 Figure 9: Scope - Blacklist
Individual search terms can be removed at any time using the delete control in the Actions column. For entries of type Domain, Email, or TLD, the Actions column additionally provides the Change search scope control. Domains and TLDs can use Attack surface, Darknet, and Employees; email addresses can use Darknet and Employees. The exact options depend on the company plan.
Result
Following the addition of one or more search terms, the platform automatically initiates a re-analysis of the extended scope. The status indicator Updating data is displayed next to the project name for the duration of the operation.
Once the analysis has been completed, newly identified assets appear in the Discovery view for assessment, and confirmed assets are available in the Assets view. We recommend repeating the assessment cycle until no further relevant findings are reported.
Adding search terms manually
Search terms may also be added independently of the discovery findings. Open the Scope tab, select the Search terms sub-tab, and select Add search terms. The dialogue follows the same two-step sequence as the project creation dialogue.
In Step 1 of 2 · General, enter one entry per line in the Targets field, or select Upload file to import a TXT file (maximum 0.5 MB, up to 400 characters per line). The following target types are accepted:
| Target type | Example |
|---|---|
| Domains (FQDN) | examplecompany.com, vpn.examplecompany2.com |
| Email addresses | security@examplecompany.com |
| Search terms | Example Company GmbH, ExampleOps Platform |
| IP addresses | 192.0.2.15, 198.51.100.25 |
| IP ranges (CIDR) | 192.0.2.0/24, 198.51.100.0/22 |
Administrators can additionally classify a valid top-level domain, such as com, as TLD. For other users, the same value is treated as a keyword.
Entries that cannot be added are reported in this step already, stating the reason for each. For example a host name that is already covered by a domain in the project scope. A minimum of three characters is required per keyword.
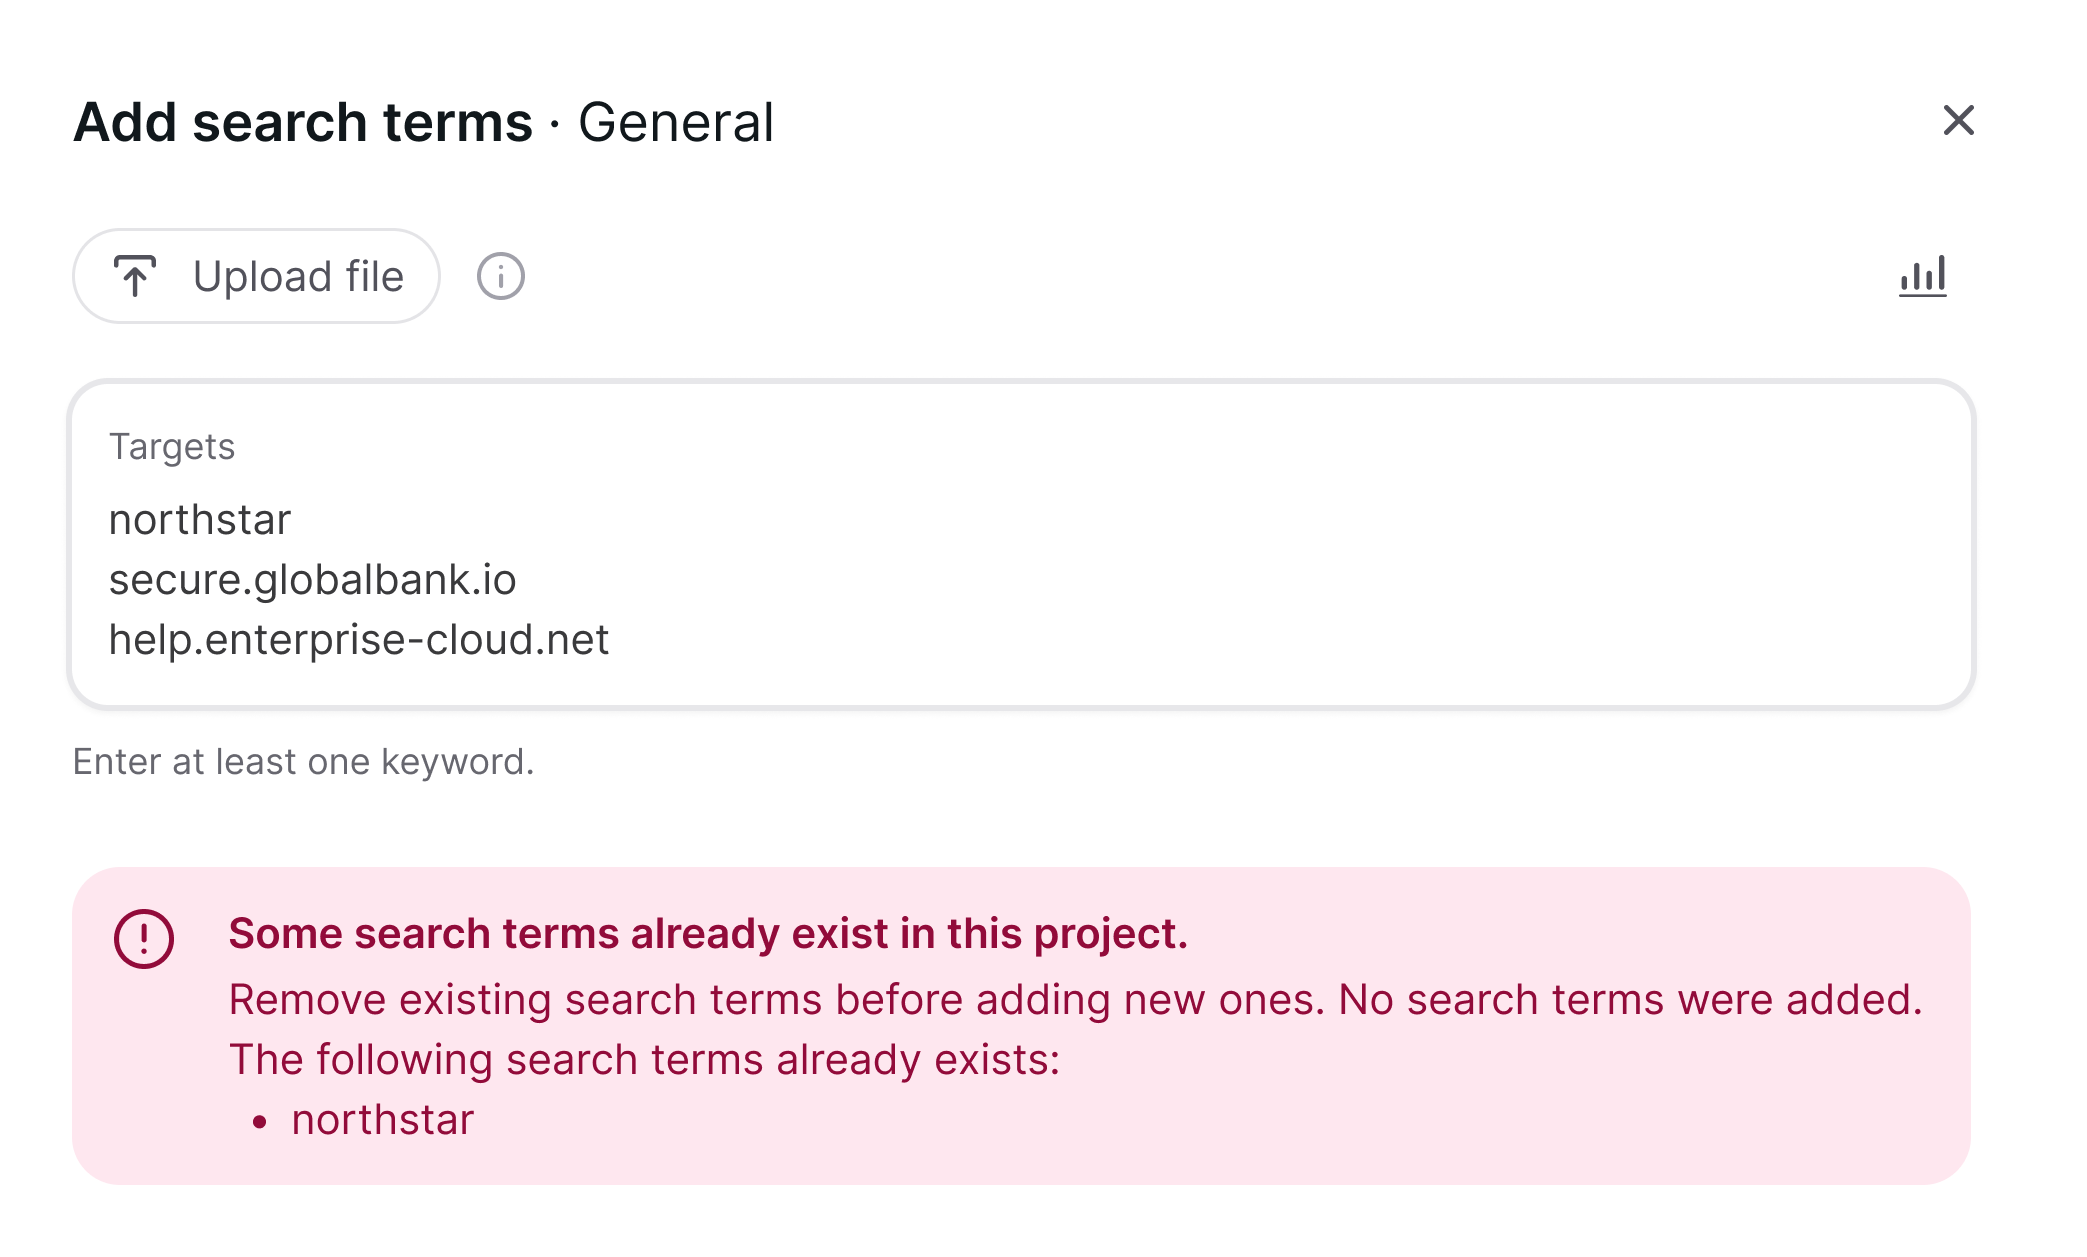 Figure 10: Adding search terms manually - General (Step 1 of 2)
Select Continue to review the entries in Step 2 of 2 · Scope options as described in Step 3, then select Add to apply them. Selecting Back returns to Step 1, where entries removed in Step 2 are already omitted from the Targets field.
This approach is appropriate where assets are known to your organisation but have not yet been identified by the platform, for example newly registered domains or recently commissioned network ranges.
Troubleshooting
| Observation | Possible cause | Recommended action |
|---|---|---|
| The number of open findings decreases by more than the number of confirmed entries. | The added search terms also cover other pending findings, which are resolved in the same operation. | No action required. This behaviour is expected. |
| No new assets appear after a search term has been added. | The re-analysis has not yet been completed. | Wait until the Updating data indicator is no longer displayed, then review the Discovery and Assets views again. |
| A finding reappears after having been removed. | The finding was removed using Delete rather than Remove and add to blacklist. | Use the blacklist action to permanently exclude recurring false positives. |
| The Add button in Step 2 of the dialogue cannot be selected. | At least one entry carries a blocking validation error, which is shown in red in the Search scope column. | Correct the affected entry using the pencil control, or remove it using the delete control. |
| Resource limits are exhausted. | The number of search terms exceeds the quota of your plan. | Remove search terms that are no longer required, or contact your account manager regarding an upgrade. |
| The volume of findings is unmanageably large. | The scope is defined too broadly, or generic third-party values have been confirmed. | Review the search term list for generic entries such as provider names, and blacklist the corresponding values. |